All Categories
Featured
Table of Contents
- – Rv Air Conditioning Repair Near Me Silverado, CA
- – OCRV Center
- – Onan Generator Repair Silverado, CA
- – Rv Air Conditioning Repair Near Me Silverado, CA
- – Fiberglass Roof Repair Silverado, CA
- – Norcold Rv Refrigerator Repair Silverado, CA
- – Rv Window Repair Near Me Silverado, CA
- – Rv Mechanic Silverado, CA
- – Rv Air Conditioner Repair Silverado, CA
- – Rv Mechanic Silverado, CA
- – Norcold Rv Refrigerator Repair Silverado, CA
- – Rv Engine Repair Near Me Silverado, CA
- – Rv Air Conditioning Repair Silverado, CA
- – Rv Ac Repair Silverado, CA
- – Motorhome Generator Repair Silverado, CA
- – OCRV Center
Rv Air Conditioning Repair Near Me Silverado, CA
With your materials prepared and damage assessment total, it's time to prepare the level roofing system for repair by cleaning and keying the location around the damage. This action is vital in assuring a solid bond between the old roofing and the new fixing product. To prepare the area, you'll need to use a disc sander to clean down the edges of the repair area and eliminate meddlesome damages material.
Validate the surface area is tidy, completely dry, and free of impurities prior to applying the repair service combination. Cleaning up the repair service location involves 2 necessary steps: First, make use of a disc sander to get rid of noticeable damages product and smooth out the edges of the repair work area.
You'll want to clean an area of concerning 2-3 inches in circumference around the damage to key the area. Next off, order some Acetone and clean the location to get rid of any kind of blockages.
By doing so, you'll be producing a solid structure for the repair work. Since the repair location is clean and devoid of debris, it's time to blend the fixing mix that will bond with the existing roof covering. This mix is important to an effective fixing, as it will certainly fill up in the broken area and provide a strong, water tight seal.
Onan Generator Repair Silverado, CA
Now that your fixing mix is prepared, you're one action more detailed to a successful roofing repair work. Applying the fresh combined repair service mix to the damaged location, you'll want to load it in completely, making certain to press it strongly into the sides and corners to remove any kind of air pockets.
Ensure to load the area a little above the bordering surface area, as the combination will certainly shrink a little as it dries out. Make use of a level or straightedge to validate the filled location is even and smooth. If needed, make use of a wet cloth to remove any kind of excess combination that has actually ejected past the damaged location.
This last step is crucial to assure a resilient and resilient fixing. Mix the overcoat according to the producer's directions and apply it evenly making use of a roller or brush.
Rv Air Conditioning Repair Near Me Silverado, CA
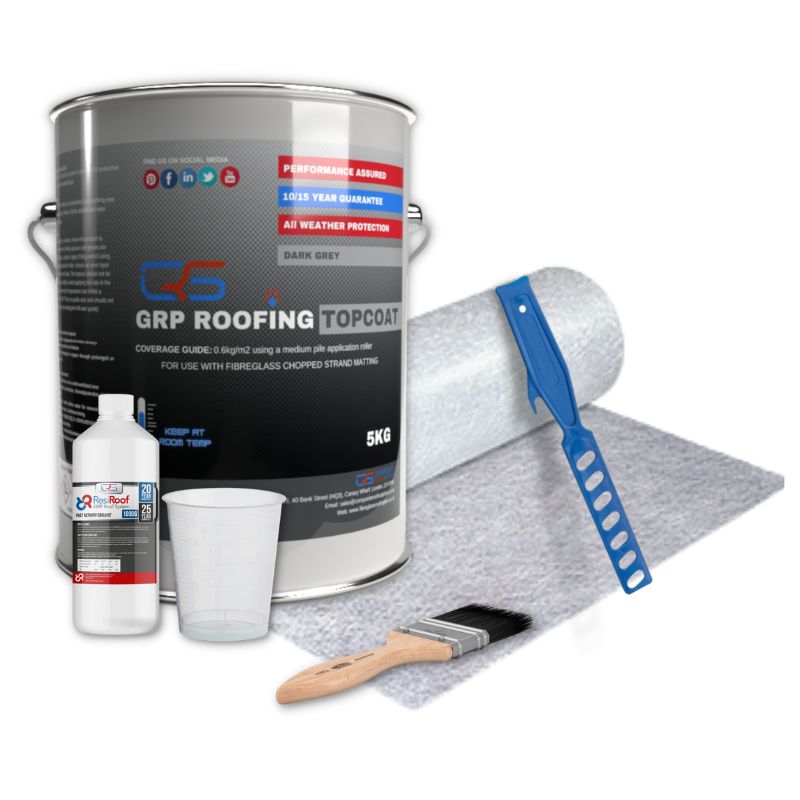
Use a clean, lint-free fabric to remove any type of excess overcoat from surrounding areas. While the GRP Repair service package is an outstanding option for dealing with fractures in your GRP roofing, there are various other repair materials available that can assist you tackle more comprehensive damages or details roofing issues.
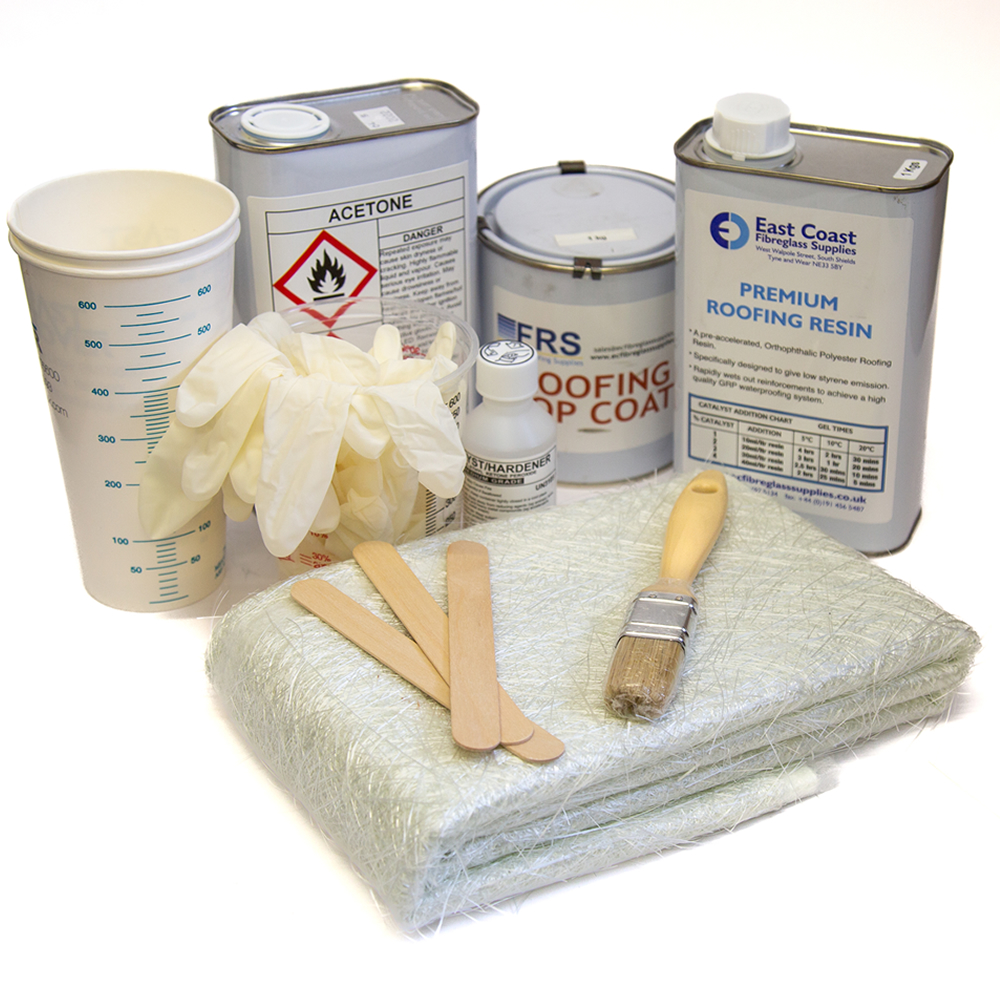
By using a combination of the repair materials pointed out earlier, you can ensure a water tight seal that will shield your fiberglass level roof from further damage. To accredit a water-proof finish, start by applying a coat of fiberglass resin to the entire fixed area. This will certainly help to bond the brand-new product to the existing roof covering and produce a strong, long lasting surface area.
Fiberglass Roof Repair Silverado, CA
Use a roller to push the matting firmly onto the roof covering, making certain to get rid of any kind of air pockets or bubbles.!! Now, assure the repair service location is completely healed and examine it by putting water over it.
Bear in mind to attend to any type of problems without delay to stop water ingress and further deterioration. Your fibreglass level roof must currently be safe and secure and leak-proof, securing your structure from the elements.
Norcold Rv Refrigerator Repair Silverado, CA
The allure of a RV is that it allows you live a life ofadventure and flexibility. Journey and liberty just last while your roofdoes. And with a fiberglass roof, recreational vehicle roof covering maintenance and repair can seemdifficult and complicated. That's why we've put together this listing of top RVfiberglass roofing fixing pointers.
Like a lot of products, it has its advantages and disadvantages. Your Recreational vehicle fiberglass roof covering repairwill be much easier if you keep the following in mind as you work: The same is true of rubber roofs.
The factor for this? You just do not have a full feeling of the quality of your fiberglass unless youcan see it from the top. Don't wait on your recreational vehicle to start leakingit's muchbetter to capture issues beforehand. As an example, Life-SealSilicone/Polyurethane SealerLife-SealSilicone/Polyurethane Sealer (Rv Repair Shops Near Me Silverado) is particularly created forfiberglass. Make sure that you use this sort of sealant to make sure that you getthe proper bonding and curing.
There are only a number of reasons that would validate detaching an old fiberglass roofing. The fiberglass roof covering is too fragile to support the intended weight lots. Long, far-ranging fractures that are past the factor of repair service. Apart from the structure no much longer being stable, lots of other concerns can be remedied.
Rv Window Repair Near Me Silverado, CA
It appeared like this was a roofing system that could conveniently leakage so I determined to "beef up" the extremely lengthy roofing system joints. Sikaflex was the incorrect selection since this sealant is not "self leveling" it retains its form and does not flatten out.
I need to have removed it, however I place Eternabond tape over all the Sikaflex. Sikaflex Bulge When I checked the roof covering the following year, I found that the Eternabond tape had "tented up" over the Sikaflex caulk. It was likewise apparent that the tape was not staying with the caulk.
Rv Mechanic Silverado, CA
Also in locations where the tape has actually separated from the caulk, the Eternabond considerably resisted removal. Note that when Eternabond is removed with a warm gun, a lot of the tape's adhesive (butyl rubber, I believe) will stay on the roofing.
Eternabond Tape/Adhesive Tests Secondly, after eliminating all the tape, I removed much of the original repainted sealant from around the entire fiberglass sheet on the roofing (Rv Repair Shops Near Me Silverado). I did this due to the fact that I saw some locations of the roofing had bulged up indicating possible water damage. This turned out to be the situation
Rv Air Conditioner Repair Silverado, CA
Prior to selecting another roofing sealant, I ran some tests to see exactly how well Eternabond tape stuck to a number of sorts of adhesives and sealants. My "clinical" results:. This silicone-based product needs to be no shock. Just state no to silicone. The PLS30 is still rubbery after 5 months. Dicor is the one to defeat.
Dicor also makes a non-self-leveling version. When I tried pulling off the Eternabond, the White Lightning came with the Eternabond. The White Lightning had the least surface attachment of all the products I checked.
Rv Mechanic Silverado, CA
On its own, Sikaflex is an excellent sealer, however Eternabond doesn't stick to it. This stuff can have saved the Titanic. Zow! A sealant and adhesive. It takes at the very least a week to treat. Solution: 3M 5200 Quick Treatment (24 hours). Below are my fiberglass roof covering repair service pictures.
There are a great deal of people doing grp roofing systems who have no idea of what makes the material work. Polyester resin is a poor glue & will raise easily if moist obtains beneath or if there is bad prep work.
From here, you can take the following steps to assure a leak-proof finish. Rv Repair Shops Near Me Silverado.
Norcold Rv Refrigerator Repair Silverado, CA
You'll need to evaluate your fiberglass level roof covering very carefully to identify signs of damages, such as fractures, sores, or soft spots, prior to starting any type of repair work. This assessment will aid you establish the level of the damage and the products you'll need to repair it. Take a more detailed look at the roofing system's surface, checking for any kind of signs of wear, such as discolored or discolored locations.
With your products prepared and damages assessment full, it's time to prepare the flat roof covering for repair service by cleansing and keying the location around the damages. This step is crucial in guaranteeing a solid bond in between the old roofing and the brand-new repair service product. To prepare the area, you'll need to utilize a disc sander to clean up down the edges of the repair area and eliminate noticeable damage product.
Validate the surface area is clean, dry, and cost-free of impurities before applying the repair work mixture. Cleansing the repair work area entails two vital actions: First, utilize a disc sander to eliminate noticeable damage material and smooth out the edges of the repair area.
As you sand, make certain not to sand down past the fibreglass under-layer. You'll wish to clean an area of regarding 2-3 inches in circumference around the damage to key the area. Next, get some Acetone and tidy the area to get rid of any blockages. This will certainly assure a solid bond in between the new product and the existing roofing system.
Rv Engine Repair Near Me Silverado, CA
By doing so, you'll be developing a solid foundation for the repair work. Since the repair area is tidy and totally free of particles, it's time to mix the repair combination that will bond with the existing roofing. This combination is essential to a successful repair service, as it will fill out the broken location and give a strong, watertight seal.
Mix the mixture extensively up until it's smooth and regular. If you're making use of a fiberglass mat or chop hair, sufficed to dimension and include it to the blend, making sure it's completely filled. Now that your repair service mixture prepares, you're one step better to an effective roofing system repair work. Applying the fresh mixed repair service blend to the damaged location, you'll wish to load it in totally, making sure to press it strongly into the edges and edges to eliminate any type of air pockets.
Make sure to fill the location a little above the bordering surface, as the mix will certainly diminish a little as it dries. Utilize a degree or straightedge to verify the filled up location is also and smooth. If necessary, utilize a moist fabric to get rid of any type of excess mix that has pressed out beyond the damaged location.
As soon as completely dry, use a fining sand block or sandpaper to smooth out the loaded location, feathering it out towards the edges so it mixes flawlessly with the bordering surface. Beware not to sand too strongly, as this can develop scratches or swirl marks. By filling out the repair appropriately, you'll develop a strong foundation for the final topcoat.
Rv Air Conditioning Repair Silverado, CA
This last step is essential to guarantee a long lasting and lasting repair work. Before applying the topcoat, see to it the surface area is clean, dry, and devoid of dust or particles. Mix the topcoat according to the producer's directions and apply it uniformly making use of a roller or brush. Work in tiny sections to maintain even coverage and stay clear of merging.
Operate in a well-ventilated location to stop breathing in fumes. Prevent using the overcoat in straight sunshine or during severe climate condition. Use a tidy, lint-free cloth to eliminate any kind of excess overcoat from surrounding areas. Check the finished surface area for any type of flaws or locations that may need additional coats. While the GRP Fixing set is a superb alternative for addressing splits in your GRP roof, there are various other repair materials offered that can aid you take on extra substantial damages or particular roofing problems.
By applying a combination of the repair work products stated earlier, you can assure a leak-proof seal that will shield your fiberglass level roofing from more damages. To certify a waterproof surface, beginning by applying a coat of fiberglass material to the whole fixed area. This will certainly aid to bond the new product to the existing roofing and produce a solid, durable surface area.
Rv Ac Repair Silverado, CA
Make use of a roller to push the matting strongly onto the roof covering, seeing to it to eliminate any type of air pockets or bubbles. You've successfully repaired your fibreglass level roof covering!.?.!! Now, ensure the repair work location is totally healed and evaluate it by pouring water over it. If water doesn't penetrate, you have actually attained a water resistant surface.
Keep in mind to address any kind of problems quickly to avoid water access and further deterioration. Your fibreglass level roofing must currently be secure and water tight, securing your structure from the elements.
We have actually had my '76 since new, and all signs were that it was repainted with Cygnus from the factory. Offered the rail, joint sealant, and visor/rivets needed paint also, I think that was done for simple of assembly and finished. The steel rail was certainly not pre-painted, as there was very little paint inside the lip.
Motorhome Generator Repair Silverado, CA
OCRV Center
Address: 23281 La Palma Ave Yorba Linda, CA 92887Phone: (714) 909-1444
Email: [email protected]
OCRV Center
Trick concerns to be asked ahead of time is whether the existing surface area is (1) compatible with fibreglass and (2) remains in sufficient architectural problem to make a fixing. An even more thorough system adjusted from the aerospace market is outlined below and supplies a choice tree to analyze the feasibility of a fibreglass repair work.
Rv Air Conditioner Repair Silverado, CARv Ac Repair Silverado, CA
Rv Window Repair Silverado, CA
Onan Generator Repair Silverado, CA
Rv Windshield Repair Silverado, CA
Rv Windshield Replacement Silverado, CA
Motorhome Generator Repair Silverado, CA
Motorhome Air Conditioner Repair Silverado, CA
Norcold Refrigerator Repair Silverado, CA
Norcold Repair Silverado, CA
Rv Air Conditioner Repair Near Me Silverado, CA
Rv Service And Repair Silverado, CA
Rv Service And Repair Silverado, CA
Rv Repair Shops Near Me Silverado, CA
Norcold Rv Refrigerator Repair Silverado, CA
Rv Ac Repair Silverado, CA
Rv Mechanic Silverado, CA
Rv Windshield Repair Silverado, CA
Rv Ac Repair Silverado, CA
Rv Windshield Replacement Silverado, CA
Rv Air Conditioning Repair Near Me Silverado, CA
Rv Engine Repair Near Me Silverado, CA
Norcold Rv Refrigerator Repair Silverado, CA
Rv Windshield Repair Silverado, CA
Rv Repair Shops Near Me Silverado, CA
Rv A/C Repair Near Me Silverado, CA
Rv Windshield Replacement Silverado, CA
Rv Window Repair Silverado, CA
Rv Air Conditioning Repair Near Me Silverado, CA
Dometic Refrigerator Repair Silverado, CA
Rv Air Conditioning Repair Near Me Silverado, CA
Rv Air Conditioner Repair Near Me Silverado, CA
Motorhome Generator Repair Silverado, CA
Rv Service And Repair Silverado, CA
Rv Service And Repair Silverado, CA
Motorhome Generator Repair Silverado, CA
Rv Repair Shops Near Me Silverado, CA
Dometic Refrigerator Repair Silverado, CA
Rv Windshield Repair Near Me Silverado, CA
Rv Repair Shop Near Me Silverado, CA
Rv Mechanic Silverado, CA
Rv Mechanic Near Me Silverado, CA
Rv Windshield Repair Near Me Silverado, CA
Rv Windshield Repair Near Me Silverado, CA
Rv Ac Repair Silverado, CA
Dometic Refrigerator Repair Silverado, CA
Emergency Rv Repair Near Me Silverado, CA
Fiberglass Roof Repair Silverado, CA
Motorhome Air Conditioner Repair Silverado, CA
Rv Ac Repair Silverado, CA
Norcold Refrigerator Repair Silverado, CA
Rv Generator Repair Near Me Silverado, CA
Motorhome Air Conditioner Repair Silverado, CA
Norcold Rv Refrigerator Repair Silverado, CA
Rv Repair Shops Near Me Silverado, CA
Rv Window Repair Silverado, CA
Rv Repair Shops Silverado, CA
Rv Air Conditioning Repair Silverado, CA
Rv Air Conditioning Repair Silverado, CA
Rv Mechanic Near Me Silverado, CA
Rv Generator Repair Near Me Silverado, CA
Rv Repair Shops Near Me Silverado, CA
Rv Fridge Repair Silverado, CA
Rv Air Conditioner Repair Silverado, CA
Motorhome Air Conditioner Repair Silverado, CA
Rv Air Conditioning Repair Silverado, CA
Motorhome Repair Shop Near Me Silverado, CA
Rv Fridge Repair Silverado, CA
Dometic Refrigerator Repair Silverado, CA
Rv Service And Repair Silverado, CA
Norcold Repair Silverado, CA
Onan Generator Repair Silverado, CA
Rv Repair Shops Near Me Silverado, CA
Rv Window Repair Silverado, CA
Rv Air Conditioning Repair Near Me Silverado, CA
Rv Air Conditioner Repair Silverado, CA
Rv Repair Shops Near Me Silverado, CA
Rv Air Conditioner Repair Near Me Silverado, CA
Finding A Seo Companies Near Me Silverado, CA
Find Seo Optimization Silverado, CA
OCRV Center
Table of Contents
- – Rv Air Conditioning Repair Near Me Silverado, CA
- – OCRV Center
- – Onan Generator Repair Silverado, CA
- – Rv Air Conditioning Repair Near Me Silverado, CA
- – Fiberglass Roof Repair Silverado, CA
- – Norcold Rv Refrigerator Repair Silverado, CA
- – Rv Window Repair Near Me Silverado, CA
- – Rv Mechanic Silverado, CA
- – Rv Air Conditioner Repair Silverado, CA
- – Rv Mechanic Silverado, CA
- – Norcold Rv Refrigerator Repair Silverado, CA
- – Rv Engine Repair Near Me Silverado, CA
- – Rv Air Conditioning Repair Silverado, CA
- – Rv Ac Repair Silverado, CA
- – Motorhome Generator Repair Silverado, CA
- – OCRV Center
Latest Posts
Eye Insurance For Seniors Irvine
Westminster Medicare Dental Insurance For Seniors
Key Man Disability Insurance Garden Grove
More
Latest Posts
Eye Insurance For Seniors Irvine
Westminster Medicare Dental Insurance For Seniors
Key Man Disability Insurance Garden Grove