All Categories
Featured
Table of Contents
- – Rv Rubber Roof Maintenance Irvine, CA
- – OCRV Center
- – Rubber Roofing For Campers Irvine, CA
- – Rv Slide Out Roof Repair Irvine, CA
- – Epdm Rv Roof Repair Irvine, CA
- – Rv Roof Repair Service Near Me Irvine, CA
- – Rv Roof Repair Near Me Irvine, CA
- – Rv Roof Repair Irvine, CA
- – Best Rv Roof Repair Irvine, CA
- – Rv Fiberglass Roof Repair Irvine, CA
- – Rv Roof Repair Irvine, CA
- – Rv Roof Maintenance Irvine, CA
- – Rv Roof Repair Near Me Irvine, CA
- – Rv Trailer Roof Repair Irvine, CA
- – Roof Repair For Rv Irvine, CA
- – OCRV Center
Rv Rubber Roof Maintenance Irvine, CA
This window seal will certainly let water enter Pay unique focus to seams on the leading and sides. They are a lot more vulnerable to use and leakage given that they obtain the bulk of water overflow from the roof.:. Rusty screws that protect wall surface panels, lights, and various other openings are an indication that wetness is behind the external wall surface.
One areas commonly missed is next to the awning. Right here's a Moving within, water damage around home windows can cause swelling, discoloration or perhaps mold and mildew in the bordering wall surface paneling.

Water leaking from the top of a window often diminishes the side of the home window into the paneling around the reduced corners. When you have actually identified what locations require to be resealed, comply with these actions to obtain an expert outcome. Utilize the pointy and level end of a scrape to remove all existing sealant.
Rubber Roofing For Campers Irvine, CA
Mineral spirits can assist relax residual sealer after the initial scrape. Put some on a rag wipe the around the area providing it a couple of minutes to do its magic before continuing. Utilize a scrape to remove old sealant If you're bothered with scraping your paint task, after that I would certainly suggest using a plastic scraper.
Spray on some window cleaner and utilize a clean cloth or shop towel to cleanse the area. Tidy surface really well before applying brand-new sealer Dry the entire location with a towel before relocating on.
It will be time consuming rather than simply free handing it. Trust me, the extra effort will certainly be worth it. Leave a little space of around 1/8 inch in between the window frame and tape for sealer. Tape around window framework leaving 1/8 border for sealant What type of sealant to make use of? Everybody has their preferred sealer for every sort of surface area and application.
I choose the clear 100% silicone sealant from my neighborhood shop since it functions terrific and comes in a squeeze tube. I like a clear silicon in a squeeze tube due to the fact that it's less complicated to use in tiny areas functions great too and is a little bit more costly. I do keep a number of tubes of ProFlex helpful yet mostly use it in other areas.
Rv Slide Out Roof Repair Irvine, CA
Maintaining your RV covered is the most effective way to secure it from rainfall, snow, leaves, pollen as well as the sun. A covered car park area is excellent (I certain wish I had one), but making use of a motor home cover is the next ideal thing. As a matter of fact, I used a recreational vehicle cover to safeguard our Course C for lots of wintertimes.

Discover one that has shields from rain in addition to sun. I have actually learned that covers with thicker fabric last much longer. Handing a big motor home cover can be really difficult. Here are some practical tips to make handling a big cover less complicated. Cleaning your motor home routinely assists protect against moss and mold from forming in home window fractures.
Epdm Rv Roof Repair Irvine, CA
The seams on your RV roofing are the most subjected to weather. Including an additional layer of defense on top of any type of existing lap sealant develops an extra layer of defense.
or works helpful for this. Normal inspections and preventative maintenance is the most effective way to avoid water damages in Recreational vehicles. Repair Rv Roof Irvine. When you see a problem, take care of it earlier than later on. An excellent seal work ought to last at the very least a couple years, perhaps longer with simply a little touch-up. After acquiring our older class A motorhome, I invested a couple weeks resealing the entire motor home.
I wish this aids you out instead of just giving you more work to do. Here are a couple relevant articles that may intrigue you as well.
Rv Roof Repair Service Near Me Irvine, CA
I am taking my RV out of storage space and plan to evaluate the joints and sealants on the recreational vehicle roof covering for any kind of damage (Repair Rv Roof Irvine). Can you inform me what products and approaches work best for re-caulking your recreational vehicle roof covering and how frequently the upkeep should be done? That's a fantastic question and fairly usually I see suggestions on this subject that is completely incorrect
When you check the joints and sealers on your RV roof covering appearance for cracked or dried out sealants that could be separating and enabling water to obtain penetrate the surface area of the roofing. If during your examinations you recognize any prospective leaks in the old sealer it will certainly need to be resealed.
One vital step is to see if the water has actually already harmed the roof's surface area around the area where it has actually passed through the sealant. You can go inside the motor home and really feel around the location for soft spots or search for signs of water staining. If the roof covering framework is harmed it will certainly need fixings a lot extra substantial than we are going over right here.
Rv Roof Repair Near Me Irvine, CA
If I identify any type of fractured or separated sealant throughout an examination I get rid of any type of old sealer that is loose around the location I am resealing. To do this I utilize a plastic squeegee similar to what is utilized when you do body work on a vehicle. They can be bought at any type of auto components store.
When the loose cracked or dried sealant is gotten rid of from the suspicious location I cleanse it with denatured alcohol on a rag and utilize the right Dicor sealer or various other suitable sealant with a caulking gun to reseal the location. If the old sealer is broken, but not loosened or dividing from the surface it is not required to get rid of the old sealant.
That's all there is to it. If you review a short article concerning resealing your motor home roof and it says to obtain up on the roofing system with some silicone sealer to reseal a rubber roof the writer does not understand what they are speaking about. Adhere to the assessment and upkeep periods in your recreational vehicle proprietor's handbook and reseal any type of prospective damage with a sealer compatible with yor motor home roofing product and your motor home roofing will last for lots of trouble-free years.
Rv Roof Repair Irvine, CA
You ought to likewise inspect and reseal all of the various other joints and sealants on the exterior of your motor home at normal periods. Consult the recreational vehicle owner's handbook or your motor home dealer for sealants compatible with the surface area you are trying to fix. For more details on recreational vehicle roofing treatment and maintenance enjoy the videos published listed below.
93Cobra2771 created: If done correctly, the existing caulk is removed, and new dicor self leveling caulk is used. Many suppliers state to do this on a yearly basis. You can also use a new layer over an existing layer, but it is usually suggested to just do it once like that.
It will certainly differ according to how hefty you lay it on, and how several things you have stuck through your roofing system (vents, etc). I personally went with eternabond tape over all my seams, so I never ever have to fret about the sealing on my roofing system once again.
Best Rv Roof Repair Irvine, CA
Strategy on a number of excellent weekend breaks to apply it correctly, but it is so worth it in the end. I agree with all the factors made by cobra, especailly the component regarding getting rid of the old sealant and using Eternabond for an one time permanent reseal that should last longer than the life of the roofing.
Locating a leakage in your motor home is a reason for concern. When you have determined that the roofing is the culprit of undesirable wetness, you'll need to begin the RV roofing system resealing process. You'll wish to get this done as quickly as possible, Nevertheless, the longer your RV sits with an unaddressed opening in the roofing, the extra most likely it is that your gear will receive damages, which can jeopardize your financial investment.
Rv Fiberglass Roof Repair Irvine, CA
Scour fully of that surface, from the rooftop devices to the edges where the roof covering satisfies the RV wall surface. After the main scrub-down, deal with the area with massaging alcohol to eradicate any persistent deposit. The last swab with mineral spirits makes sure a beautiful surface area. The objective here is to make certain the sealant will stick. Repair Rv Roof Irvine.
As soon as you've removed all of the old sealants, it's time to lay down a tidy, strong foundation for the brand-new. When your roof covering is prepared, the next action is to select the right sealer.
It can be hard to choose between tape and fluid sealants. The objective is to stay aggressive and make certain your Recreational vehicle continues to be a risk-free and dry place.
Rv Roof Repair Irvine, CA
, you'll want to locate the best place to keep it. If you require a confined or covered Recreational vehicle storage space area near you, provide Next-door neighbor a try.
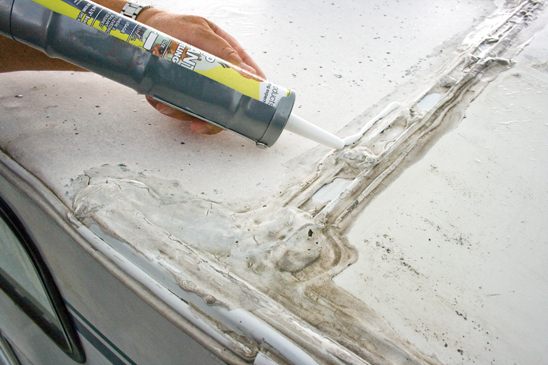
Reseal Motor home roofing system joints using a. Apply this with a caulk gun and allow it to treat to create a water tight bond. Prior to applying a new sealer to your RV roofing, you need to initially eliminate the old sealant.
There are particular areas that are more susceptible to having troubles than others. The entire roof covering gets the force of the damaging UV rays that can create cracking. Furthermore, the edges where the walls meet can slowly separate creating issue areas. Then, you have the normal spots around the windows, doors, and flanges.
That is why it is vital you check these areas regularly and reseal them when required. The lure is to make use of silicone due to the fact that it is used around your traditional home. Silicone could not be your ideal wager. Silicone battles to stick to formerly used silicone making it bothersome to repair in the future.
Rv Roof Maintenance Irvine, CA
And that isn't suitable for something that moves down the road at 60+ miles per hour. Rather of silicone you will want to utilize something designed for RVs and its particular application.
Do not utilize these tapes as a method to stay clear of replacing your roofing. While evaluating your roof covering, you'll desire to take your time and not hurry via this process.
Minor fractures are normaldue to sun exposureso do not worry, yet do not neglect them either. There might be some significant damages too. If you do locate extreme splits, you will certainly require to remove any debris and sealer that was formerly utilized. To make it easier, you could attempt making use of a warmth weapon.
Rv Roof Repair Near Me Irvine, CA
Yet please take care not to damage your RV's exterior paint. Prior to using the new sealer, tidy the location with acetone to eliminate all deposit, oils, dust, and debris, guaranteeing a clear base for the product to stick to. This aids ensure a durable sealer is happening. If you wish to make it look good, you can achieve this with a little bit of persistence and lots of tape.
Then, use a bead of sealer utilizing a caulk gun and smooth the bead with your finger or a caulk device. After applying and smoothing the bead of sealant, eliminate the painter's tape quickly, and allow the sealer treatment for at least 24 hours. By adhering to these steps, you can reseal your motor home outside properly, making sure maximum defense versus water damage.
You can find out more about that here.
Rv Trailer Roof Repair Irvine, CA
If you are uncertain which of both membranes is utilized on your RV, you can contact the manufacturer or the dealership, or you can examine the membrane itself. TPO is the exact same shade on both sides (generally white or off-white), and frequently has a fleece backing on one side.
It's the right option to seal joints around skylights, vents, and other accessories placed level on the roof. On the various other hand, if you are re-sealing joints and fractures on vertical surfaces, around home windows and other openings, pick a non-sag sealer that will certainly remain in location while it dries out. Keep in mind: While they have lots of exceptional buildings, widely available silicon sealers aren't the most effective choice for roofing system fixings, due to the fact that they don't adhere firmly to other sealers, developing a risk of failing where brand-new silicon is applied over old seals.
These make quick fixings of small areas very easy, and can be utilized for tiny holes or tears in the roof membrane layer. A lot more on these listed below. Like several various other maintenance processes, re-sealing starts with this guideline: Make certain the area you are working on is without dirt, loosened caulk, or other foreign matter.
Roof Repair For Rv Irvine, CA
OCRV Center
Address: 23281 La Palma Ave Yorba Linda, CA 92887Phone: (714) 909-1444
Email: [email protected]
OCRV Center
Ensure you comply with the guidelines above, picking an item that is compatible with your roofing system kind and the job you will be doing. Cover the areas you wish to secure with the motor home sealant. Watch out for problem areas and see to it they are well-sealed. This brand-new layer of sealant should totally cover any kind of old sealer, and no voids need to be left in between the sealer and the surface area it is covering.
Rubber Roof For Camper Irvine, CAMotorhome Roof Replacement Irvine, CA
Rv Rubber Roof Replacement Cost Irvine, CA
Rv Rubber Roof Repair Irvine, CA
Rv Rubber Roof Replacement Irvine, CA
Epdm Rv Roof Repair Irvine, CA
Replace Rv Roof Irvine, CA
Rubber Roof For Rv Irvine, CA
Rv Fiberglass Roof Repair Irvine, CA
Rv Rubber Roof Repair Irvine, CA
Roof Repair For Rv Irvine, CA
Motorhome Roof Replacement Irvine, CA
Resealing Rv Roof Irvine, CA
Rv Slide Out Roof Repair Irvine, CA
Rubber Roofing For Rv Irvine, CA
Rv Rubber Roof Repair Irvine, CA
Roof Repair For Rv Irvine, CA
Rubber Roof For Camper Irvine, CA
Rubber Roofing For Campers Irvine, CA
Rubber Roofing For Rv Irvine, CA
Rv Roof Repair Near Me Irvine, CA
Class C Rv Roof Repair Irvine, CA
Rv Rubber Roof Replacement Cost Irvine, CA
Rv Roof Maintenance Irvine, CA
Rv Fiberglass Roof Repair Irvine, CA
Rv Rubber Roof Replacement Irvine, CA
Rubber Roof For Rv Irvine, CA
Rv Trailer Roof Repair Irvine, CA
Rv Rubber Roof Maintenance Irvine, CA
Rv Roof Repair Irvine, CA
Epdm Rv Roof Repair Irvine, CA
Rv Rubber Roof Replacement Cost Irvine, CA
Rv Rubber Roof Replacement Irvine, CA
Class C Rv Roof Repair Irvine, CA
Rv Trailer Roof Repair Irvine, CA
Rv Roof Replacement Irvine, CA
Rv Roof Leak Repair Near Me Irvine, CA
Replace Rv Roof Irvine, CA
Rv Roof Repair Service Near Me Irvine, CA
Resealing Rv Roof Irvine, CA
Rv Roof Leak Repair Near Me Irvine, CA
Rubber Roof For Rv Irvine, CA
Rv Trailer Rubber Roof Repair Irvine, CA
Rv Rubber Roof Maintenance Irvine, CA
Rv Roof Maintenance Irvine, CA
Rv Rubber Roof Replacement Cost Irvine, CA
Rv Rubber Roof Repair Irvine, CA
Rv Trailer Roof Repair Irvine, CA
Epdm Rv Roof Repair Irvine, CA
Rv Rubber Roof Maintenance Irvine, CA
Class C Rv Roof Repair Irvine, CA
Rubber Roof For Camper Irvine, CA
Rv Trailer Rubber Roof Repair Irvine, CA
Rv Roof Maintenance Irvine, CA
Best Rv Roof Repair Irvine, CA
Rubber Roof For Camper Irvine, CA
Rv Rubber Roof Repair Irvine, CA
Rv Trailer Roof Repair Irvine, CA
Best Rv Roof Repair Irvine, CA
Resealing Rv Roof Irvine, CA
Rv Rubber Roof Maintenance Irvine, CA
Best Rv Roof Repair Irvine, CA
Rv Roof Repair Irvine, CA
Motorhome Roof Replacement Irvine, CA
Motorhome Roof Replacement Irvine, CA
Repair Rv Roof Leak Irvine, CA
Rv Roof Repair Irvine, CA
Rv Roof Leak Repair Near Me Irvine, CA
Rubber Roof For Rv Irvine, CA
Rv Roof Leak Repair Near Me Irvine, CA
Rv Rubber Roof Repair Irvine, CA
Rv Roof Maintenance Irvine, CA
Replace Rv Roof Irvine, CA
Epdm Rv Roof Repair Irvine, CA
Rv Roof Maintenance Irvine, CA
Rubber Roof Installation Irvine, CA
Rubber Roof Installation Irvine, CA
Rubber Roof For Rv Irvine, CA
Find A Good Seo Optimization Services Irvine, CA
Finding A Good Local Seo Services For Business Irvine, CA
OCRV Center
Table of Contents
- – Rv Rubber Roof Maintenance Irvine, CA
- – OCRV Center
- – Rubber Roofing For Campers Irvine, CA
- – Rv Slide Out Roof Repair Irvine, CA
- – Epdm Rv Roof Repair Irvine, CA
- – Rv Roof Repair Service Near Me Irvine, CA
- – Rv Roof Repair Near Me Irvine, CA
- – Rv Roof Repair Irvine, CA
- – Best Rv Roof Repair Irvine, CA
- – Rv Fiberglass Roof Repair Irvine, CA
- – Rv Roof Repair Irvine, CA
- – Rv Roof Maintenance Irvine, CA
- – Rv Roof Repair Near Me Irvine, CA
- – Rv Trailer Roof Repair Irvine, CA
- – Roof Repair For Rv Irvine, CA
- – OCRV Center
Latest Posts
Employee Benefits Solutions Newport Beach
Employee Benefits Solutions Brea
Restaurant Ventilation Cleaning La Crescenta
More
Latest Posts
Employee Benefits Solutions Newport Beach
Employee Benefits Solutions Brea
Restaurant Ventilation Cleaning La Crescenta