All Categories
Featured
Table of Contents
- – Rubber Roofing For Rv Garden Grove, CA
- – OCRV Center
- – Motorhome Roof Replacement Garden Grove, CA
- – Rv Rubber Roof Replacement Cost Garden Grove, CA
- – Rv Fiberglass Roof Repair Garden Grove, CA
- – Epdm Rv Roof Repair Garden Grove, CA
- – Epdm Rv Roof Repair Garden Grove, CA
- – Rv Rubber Roof Replacement Cost Garden Grove...
- – Best Rv Roof Repair Garden Grove, CA
- – Rv Roof Leak Repair Near Me Garden Grove, CA
- – Rv Slide Out Roof Repair Garden Grove, CA
- – Rubber Roofing For Campers Garden Grove, CA
- – Rv Slide Out Roof Repair Garden Grove, CA
- – Rv Fiberglass Roof Repair Garden Grove, CA
- – Rv Trailer Rubber Roof Repair Garden Grove, CA
- – Rv Trailer Rubber Roof Repair Garden Grove, CA
- – OCRV Center
Rubber Roofing For Rv Garden Grove, CA
Diluent Water, if required. Use as received. Clean-up calls for just warm water.
Eye get in touch with If product contacts eye, flush with water for a minimum of 15 mins and seek medical attention immediately. Skin contact If product get in touches with skin, clean influenced area with soap and water. Seek medical attention if inflammation creates or continues. Launder infected clothes prior to reuse. Inhalation Move subject to fresh air in instance of unintended inhalation of vapors or disintegration items.
Motorhome Roof Replacement Garden Grove, CA

Area nozzle right into joint and use sealant right into void. Get rid of concealing tape immediately. Wipe hands and tools extensively before washing with soap and water.
PRECAUTIONNot for inner usage. Straight call of uncured sealant irritates eyes and might aggravate skin. In situation of eye call flush eyes with water for 15 minutes and call a doctor. In case of skin call, thoroughly wash skin with soap and water. In situation of consumption seek medical interest immediately.
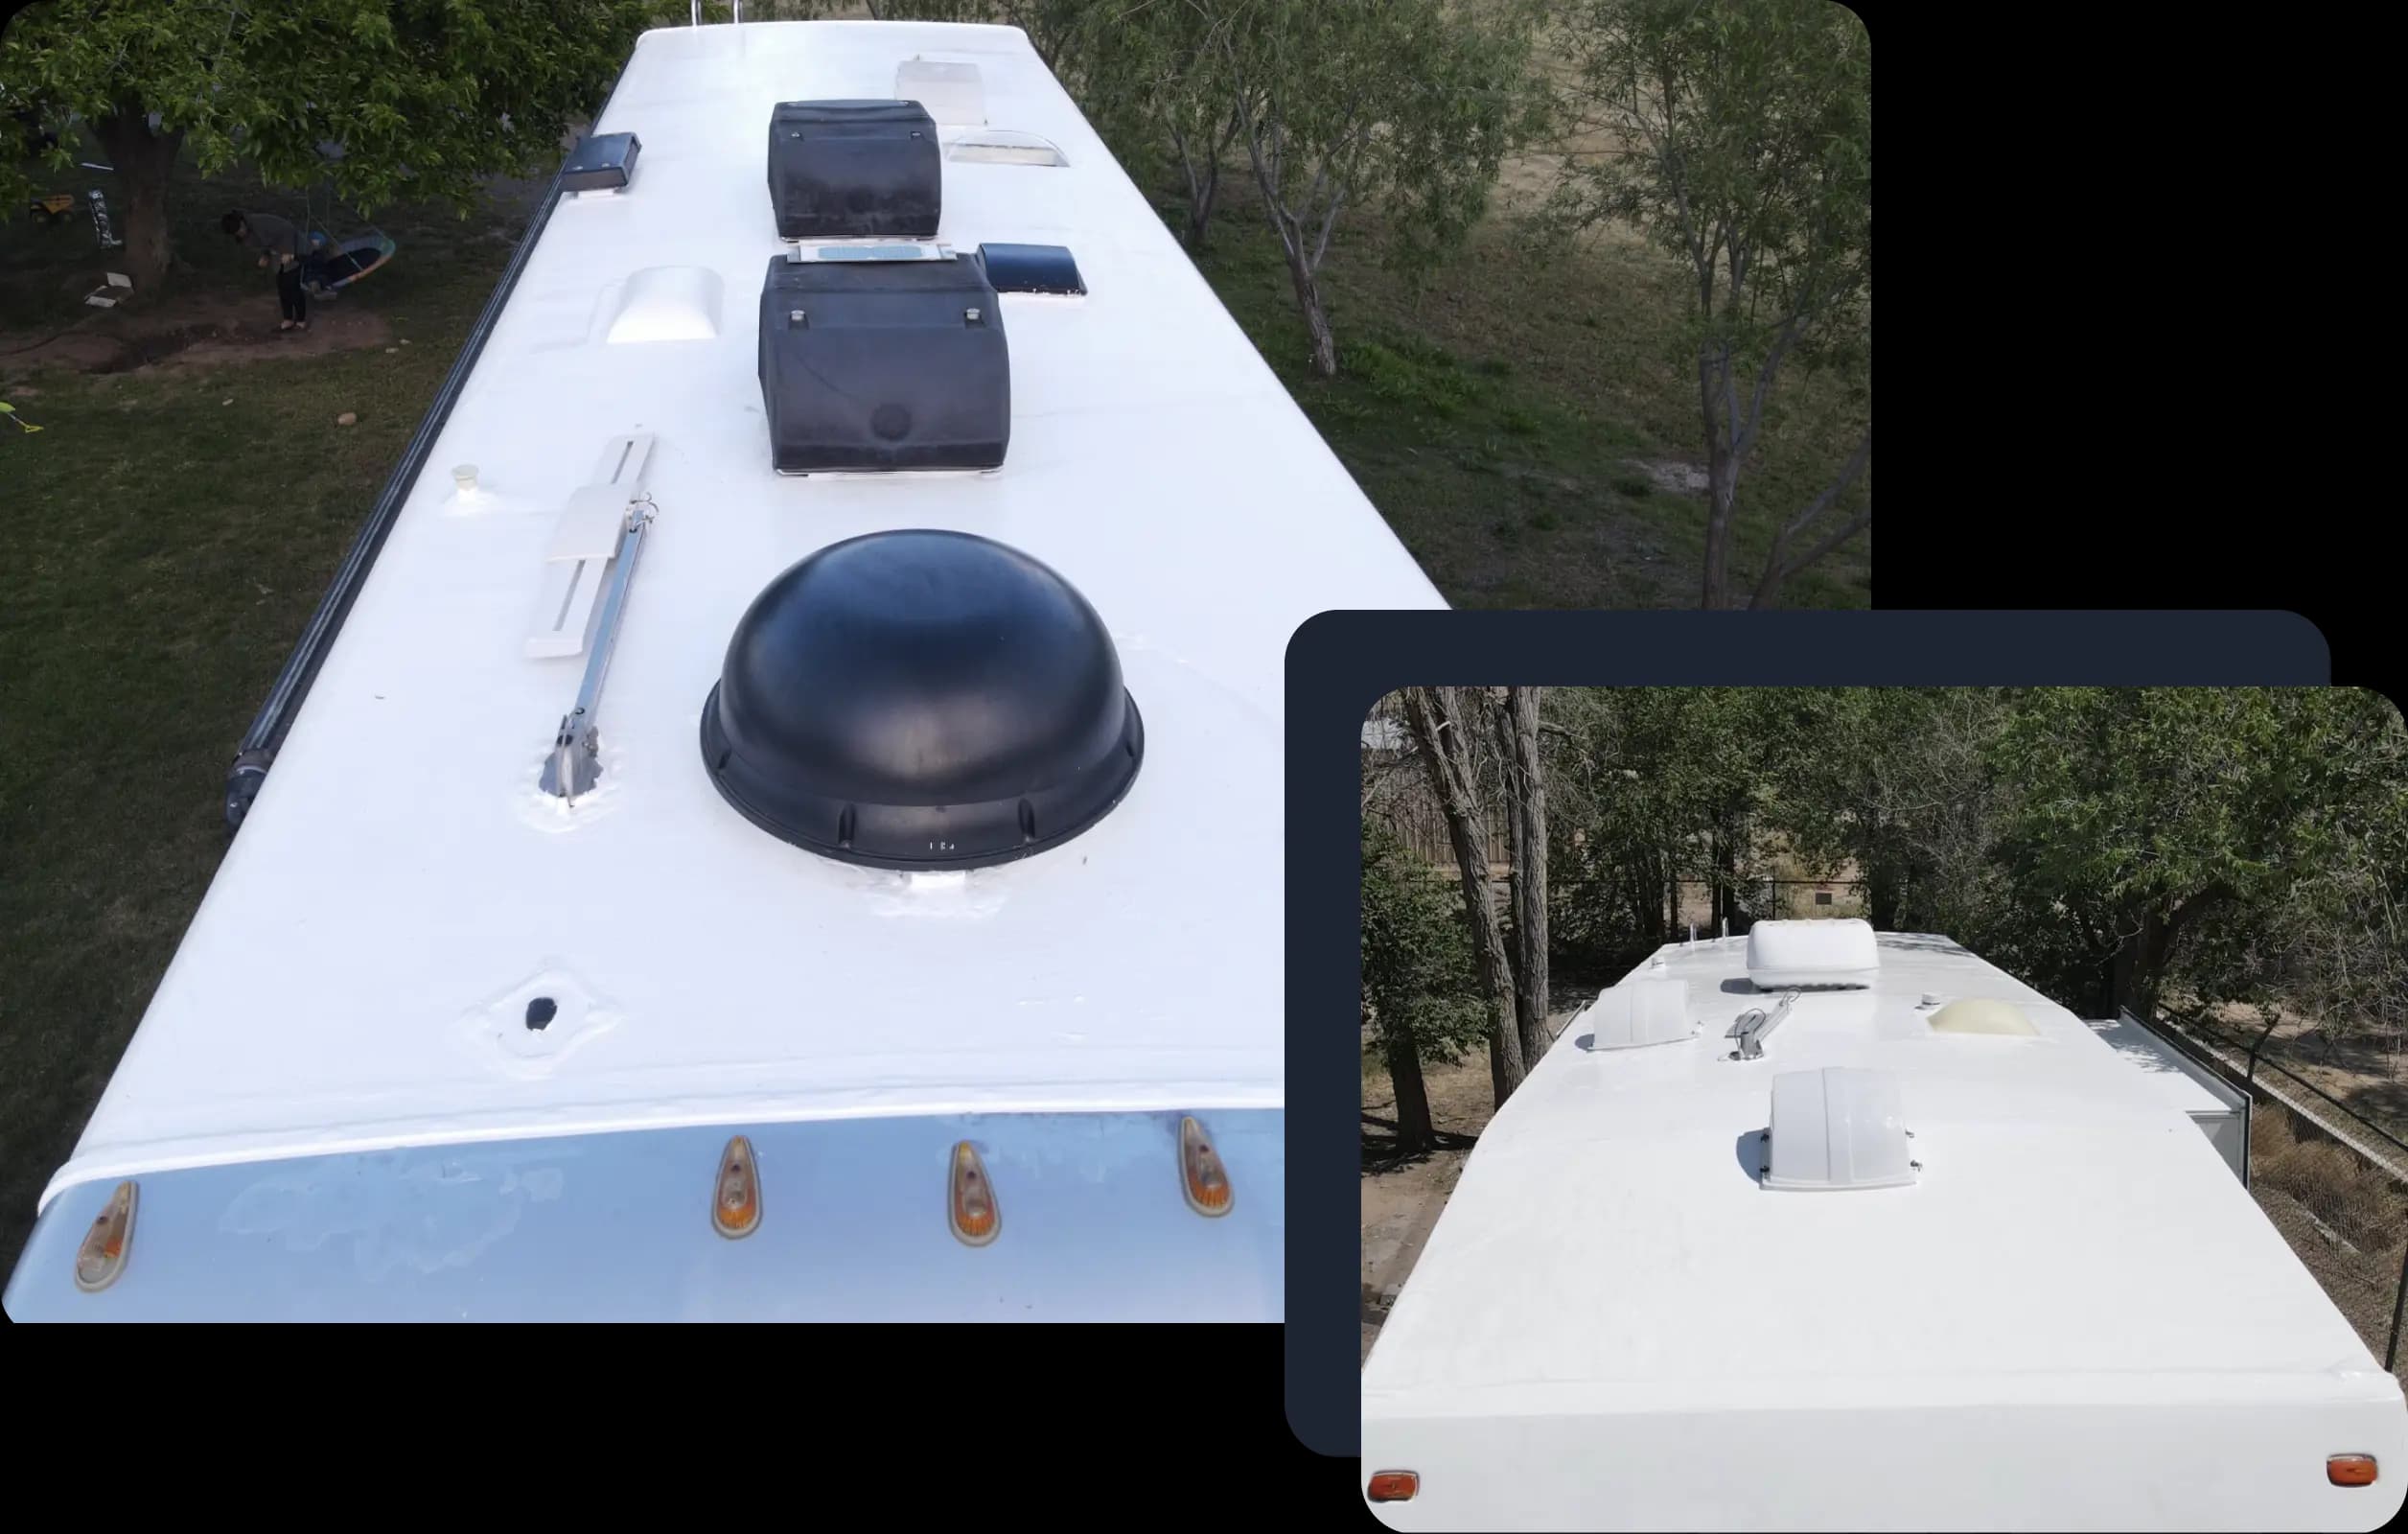
My RV roof that needs to be changed! Invite to my RV Remodelling Collection!.?.!! So you want a RV but can not afford one. If you're like me and have even more time than cash, after that probably your finest alternative is to buy an old RV and fix it up. If you occur to find an actually bargain, then opportunities are it has water damages.
I obtain it. I acquired my recreational vehicle over a year ago and didn't have the guts to begin tackling this task until today. I'm below to tell you, if I can do it, you can do it. Can I in fact do it? Remain tuned and learn! I purchased this 1993 Jamboree for $5000.
Rv Rubber Roof Replacement Cost Garden Grove, CA
Water damage! I have actually never ever worked on a Recreational vehicle before and I have to confess, I'm frightened. Ideally if you're taking into consideration doing this on your own, following along on my RV roof substitute project will provide you the nerve to dive in!
That appeared to be my cheapest choice.
I figured I prefer to have it semi-portable so I went with the canopy, plus this enables me to adjust the elevation up and down when I require to. Naturally the cheapest choice of all would be to simply throw an excellent tarp over the top of your motor home for rainy days and just work with bright days! Initially I raised the legs with 1 1/2 PVC pipe that fit inside the legs and afterwards I connected a hose clamp around the PVC pipe to stand up the canopy legs.
Rv Fiberglass Roof Repair Garden Grove, CA
This is still a little floppy. I probably ought to have forked out for some stiff steel pipe from the beginning.
Fractures in the EPDM roofing at side of camper. An old spot work on the recreational vehicle rubber roofing. Tons of caulk stacked over old trouble areas. As you can see, this roofing has had a great deal of problems throughout the years. Looking from the inside of the camper there have clearly been leaks in numerous locations of the roof covering.
I got an energy blade and started cutting. The very first thing I saw is that there were two layers. On the bottom is the original EPDM rubber roof covering layer. I know it's EPDM rubber and not TPO rubber due to the black support. (TPO roofing is white on both sides.) On top of my EPDM roofing system is a slim recreational vehicle roofing finish that was applied later on.
I simply left the roof covering coating adhered to the EPDM roofing and pulled them up together. (You do not require to peel them up individually.) Beginning to peel roofing system finish. Peeling up area of the bottom layer of rubber. This shows that the original motor home roofing system was EPDM as a result of the black support.
Epdm Rv Roof Repair Garden Grove, CA
I cut lines with an utility knife around components. All rubber roof removed from camper. This step went rather rapidly. There was an adhesive under the bottom layer of rubber that was still quite well embeded lots of locations, yet with a good little bit of force it peeled off up easily.
Now I could see all the damaged plywood roof covering outdoor decking beneath. HEADS UP! You might not want to peel off the rubber! I picked to remove the rubber before eliminating components so I can see what I was managing. I have to caution you, the old adhesive was still sticky, and a pain to stroll on.
Epdm Rv Roof Repair Garden Grove, CA
If you think you'll be saving the roof covering outdoor decking plywood (not replacing it), after that you may save on your own some clean-up problem by removing the fixtures initially and afterwards peeling up the rubber! Information of water damage on camper roof covering. A lot more water harmed areas on recreational vehicle roof covering decking. There was absolutely nothing actually terrible that made me feel like I was going to fall via, however definitely a great deal of damage and I was obtaining the sensation I would be changing a great deal of the roofing system outdoor decking plywood.
I went for the most basic one first, an air vent cap from a kitchen sink plumbing vent pipeline. There is no various other means around this, you simply have to begin digging up until you reveal the screw heads.
Loosening the screws in vent cap. The screws on this vent cap were hex-head metal screws so I utilized a tiny socket driver to remove them.
Rv Rubber Roof Replacement Cost Garden Grove, CA
I found an old wasp nest inside the vent cover. This is a view I'll most likely have actually to obtain made use of to, locating the remains of pet habitation in every space and cranny. I invest a horrible great deal of my time developing good wild animals habitat in my yard so I don't get upset when an animal picks to establish up home in my motor home.
Thankfully no one was home in this old nest so I just threw it. You should try not to damage these items (like vent covers and caps) as you're scraping off the old caulk and sealer just in instance you need to utilize them once again.
My roof air vent also had an air vent cover over it. Starting on the roof vent. Equipment subjected on roofing system air vent cap, the initial nut came off clean.
Screw is spinning. The bolts on this RV roofing vent cover were nuts on small bolts. The initial one came off fine with an extension socket set. The 2nd one simply started rotating, implying the bolt was not repaired in position but turning along with the nut. Bummer. A peek at the hardware holding down the roof vent cover.
Best Rv Roof Repair Garden Grove, CA
I really did not have any kind of great way to hold the bolt in position so rather I opted to saw with the bolts with a reciprocating saw. Sawing via screws on roof covering vent cover. I made use of a cordless reciprocating saw with a metal-cutting blade yet it was challenging to obtain the blade level enough to get to the screws so near the roofing system deck.
Flexing the blade a little bit to get to close to the roofing system deck. Cover gotten rid of from roofing system vent.
Rv Roof Leak Repair Near Me Garden Grove, CA
Many were so old and rusted that they sheared off when I loosened then with a great deal of pressure. Unscrewing the braces that held the vent cover in location. I scuffed extra caulk and roofing sealer off the flange of the roof covering vent itself. I soon discovered there were no a lot more screws or equipment holding it down so I offered up on the scuffing and went inside the recreational vehicle After scuffing the caulk and sealer from flange of roof covering air vent, no even more screws! Loosening the within cover plate of roof vent fan in motor home restroom.
A pair sheared off with a great deal of pressure, yet 2 wouldn't move. So I had to pierce out the screw heads. I picked a drill bit near the dimension of the shaft of the screws that I had actually currently pulled out and began boring. Picking a drill little bit for drilling out a screw head.
Safety and security glasses advised. So I pierced out the heads, one popped off and the various other I was obtaining frustrated with and gave it a yank prior to it was pierced with. Rather than standing out off the screw head, the plastic just dissolved around the warm screw head. Whoops. Hope I don't have to recycle this cover.
Lifting off the old roofing system vent. There are two wires running to the roofing vent (a black warm wire and a white neutral cable) that you'll require to clip to remove the old vent.
Rv Slide Out Roof Repair Garden Grove, CA
These are the wires attaching the roofing airing vent fan. I clipped them just over heaven splice joints. Roof vent eliminated and cleaned up. After clipping the cord and getting rid of the air vent, I tidied up any kind of continuing to be goop and got my very first good take a look at the roof covering framework. It's metal! 1 1/2 inches thick.
Some Motor home roofing systems are mounted with timber, others have metal framing. I scratched off some rust and made a huge mess inside the shower room.
Rubber Roofing For Campers Garden Grove, CA
Oops. Possibly I should have put a tarp down first. My final objective of the day was to get the fridge air vent cover off. I saw recreational vehicle sealer blobs at 4 factors on the cover so assumed there have to be screws under them. I pried them up and located Phillips screw heads.
Exposing the screws in the refrigerator air vent cap. Peeling off old motor home roofing covering on top of fridge air vent cap I also discovered that there was a layer of motor home roofing finish over the vent cap. These layers are repainted on with a brush so plainly whoever did this covering simply blobbed in on top of everything.
Prying off the fridge roofing air vent after all screws are removed. Virtually every screw was in good sufficient condition to get rid of with a socket driver, yet a pair were also rusty and required to be turned out with vice grasp pliers.
I removed the staying rubber roofing from under the flange and after that scraped off the old putty below. I'll clean it much better if and when I choose to recycle it. Appears like it remains in suitable form so I most likely will. Scraping off the old putty from the flange of the fridge roofing vent.
Rv Slide Out Roof Repair Garden Grove, CA
That's as for I jumped on day 1 after about 5 hours of careless work. Not a bad begin. I likewise discovered this awesome sludge mold expanding in the compost under the camper. If you have actually never ever seen a scum mold and mildew, examine out time gaps of them growing! They are freaking outstanding! A sludge mold and mildew under the camper! Now continue to tip 2 when I get rid of the remainder of the roof covering components!.
?.!!. Whether you just repelled the car dealership's whole lot or you've had your camper for numerous years, you know that your roofing system isn't under guarantee. Hence, you might desire to get your trailer's roof changed for the Lifetime Service warranty and satisfaction. You don't want to mess around with a whole lot of sales individuals, either.
Rv Fiberglass Roof Repair Garden Grove, CA
Motor Home Roof Repair Florida has actually offered the whole state of Florida for the past 30 years and has actually been working only on roofing system fixing and replacement. And we're accredited via the Recreational Car Industry Organization (RVIA) to repair and change recreational vehicle roofing systems. When you get in touch with, you'll get a totally free assessment of your roof in our Hand City Motor Home Solution Facility place.
Dicor's Rubber Roofing Repair Membranes are self-adhesive strips of EPDM rubber that repairs tears, is very resistant to degeneration and has premium water resistance. Plus, it includes no asphalt, solvent of VOCs, making it eco-friendly.
Tearing off the refrigerator roofing vent after all screws are removed. Virtually every screw was in excellent sufficient problem to remove with a socket chauffeur, however a pair were too corroded and needed to be turned out with vice grasp pliers.
I peeled the remaining rubber roofing system from under the flange and afterwards scratched off the old putty underneath. I'll clean it much better if and when I decide to recycle it. Appears like it remains in suitable shape so I most likely will. Scraping off the old putty from the flange of the refrigerator roof covering air vent.
Rv Trailer Rubber Roof Repair Garden Grove, CA
That's regarding I obtained on day 1 after regarding 5 hours of lazy job. Not a bad start. I likewise discovered this outstanding sludge mold expanding in the mulch under the camper. If you have actually never seen a sludge mold, examine out a long time gaps of them expanding! They are freaking amazing! A sludge mold under the camper! Currently remain to tip 2 when I eliminate the remainder of the roof fixtures!.
?.!!. Whether you just repelled the dealer's whole lot or you have actually possessed your camper for years, you understand that your roof isn't under guarantee. Therefore, you might desire to obtain your trailer's roof covering changed for the Lifetime Warranty and tranquility of mind. You do not desire to mess around with a great deal of sales men, either.
Rv Trailer Rubber Roof Repair Garden Grove, CA
Motor Home Roofing Fixing Florida has actually offered the whole state of Florida for the past three decades and has been functioning only on roof covering repair work and replacement. And we're certified through the Mobile home Industry Organization (RVIA) to fix and replace recreational vehicle roofing systems. When you speak to, you'll get a cost-free inspection of your roofing in our Palm City Recreational Vehicle Service Center place.
Dicor's Rubber Roofing system Repair Membranes are self-adhesive strips of EPDM rubber that repairs splits, is highly immune to degeneration and has exceptional water resistance. Plus, it has no asphalt, solvent of VOCs, making it eco pleasant.
Rubber Roof For Rv Garden Grove, CARubber Roofing For Campers Garden Grove, CA
Rv Roof Repair Garden Grove, CA
Rubber Roof For Camper Garden Grove, CA
Rv Trailer Rubber Roof Repair Garden Grove, CA
Rv Rubber Roof Replacement Cost Garden Grove, CA
Motorhome Roof Replacement Garden Grove, CA
Rv Rubber Roof Maintenance Garden Grove, CA
Rv Rubber Roof Repair Garden Grove, CA
Rv Roof Replacement Garden Grove, CA
Rubber Roof Installation Garden Grove, CA
Rubber Roof For Camper Garden Grove, CA
Rubber Roof For Camper Garden Grove, CA
Rv Roof Leak Repair Near Me Garden Grove, CA
Rv Rubber Roof Repair Garden Grove, CA
Rv Roof Leak Repair Garden Grove, CA
Rubber Roof For Rv Garden Grove, CA
Rv Roof Repair Garden Grove, CA
Rv Roof Repair Garden Grove, CA
Rv Rubber Roof Replacement Cost Garden Grove, CA
Repair Rv Roof Garden Grove, CA
Rv Roof Maintenance Garden Grove, CA
Repair Rv Roof Leak Garden Grove, CA
Rubber Roof For Rv Garden Grove, CA
Class C Rv Roof Repair Garden Grove, CA
Rv Rubber Roof Replacement Garden Grove, CA
Repair Rv Roof Garden Grove, CA
Roof Repair For Rv Garden Grove, CA
Best Rv Roof Repair Garden Grove, CA
Rv Rubber Roof Replacement Garden Grove, CA
Rv Roof Maintenance Garden Grove, CA
Rv Roof Repair Fiberglass Garden Grove, CA
Resealing Rv Roof Garden Grove, CA
Resealing Rv Roof Garden Grove, CA
Rv Roof Replacement Garden Grove, CA
Best Rv Roof Repair Garden Grove, CA
Rv Roof Maintenance Garden Grove, CA
Rv Roof Repair Near Me Garden Grove, CA
Rv Rubber Roof Replacement Garden Grove, CA
Rv Rubber Roof Repair Garden Grove, CA
Rv Fiberglass Roof Repair Garden Grove, CA
Rv Roof Repair Fiberglass Garden Grove, CA
Class C Rv Roof Repair Garden Grove, CA
Epdm Rv Roof Repair Garden Grove, CA
Replace Rv Roof Garden Grove, CA
Motorhome Roof Replacement Garden Grove, CA
Class C Rv Roof Repair Garden Grove, CA
Roof Repair For Rv Garden Grove, CA
Rv Roof Repair Fiberglass Garden Grove, CA
Rv Roof Repair Fiberglass Garden Grove, CA
Rv Slide Out Roof Repair Garden Grove, CA
Replace Rv Roof Garden Grove, CA
Class C Rv Roof Repair Garden Grove, CA
Rubber Roof For Rv Garden Grove, CA
Rv Roof Maintenance Garden Grove, CA
Repair Rv Roof Leak Garden Grove, CA
Rv Rubber Roof Replacement Cost Garden Grove, CA
Rv Slide Out Roof Repair Garden Grove, CA
Repair Rv Roof Garden Grove, CA
Rubber Roofing For Campers Garden Grove, CA
Rubber Roofing For Campers Garden Grove, CA
Rv Roof Repair Fiberglass Garden Grove, CA
Rv Slide Out Roof Repair Garden Grove, CA
Rv Roof Replacement Garden Grove, CA
Rv Rubber Roof Replacement Cost Garden Grove, CA
Rv Rubber Roof Replacement Garden Grove, CA
Rv Roof Repair Garden Grove, CA
Class C Rv Roof Repair Garden Grove, CA
Rubber Roofing For Rv Garden Grove, CA
Rv Trailer Rubber Roof Repair Garden Grove, CA
Rv Roof Maintenance Garden Grove, CA
Rv Slide Out Roof Repair Garden Grove, CA
Rv Roof Repair Fiberglass Garden Grove, CA
Rubber Roofing For Rv Garden Grove, CA
Rv Rubber Roof Repair Garden Grove, CA
Rv Roof Replacement Garden Grove, CA
Rv Roof Leak Repair Garden Grove, CA
Rubber Roofing For Rv Garden Grove, CA
Finding A Good Local Seo Company Near Me Garden Grove, CA
Near Seo Firm Garden Grove, CA
Rv Rubber Roof Maintenance Garden Grove, CA
OCRV Center
Table of Contents
- – Rubber Roofing For Rv Garden Grove, CA
- – OCRV Center
- – Motorhome Roof Replacement Garden Grove, CA
- – Rv Rubber Roof Replacement Cost Garden Grove, CA
- – Rv Fiberglass Roof Repair Garden Grove, CA
- – Epdm Rv Roof Repair Garden Grove, CA
- – Epdm Rv Roof Repair Garden Grove, CA
- – Rv Rubber Roof Replacement Cost Garden Grove...
- – Best Rv Roof Repair Garden Grove, CA
- – Rv Roof Leak Repair Near Me Garden Grove, CA
- – Rv Slide Out Roof Repair Garden Grove, CA
- – Rubber Roofing For Campers Garden Grove, CA
- – Rv Slide Out Roof Repair Garden Grove, CA
- – Rv Fiberglass Roof Repair Garden Grove, CA
- – Rv Trailer Rubber Roof Repair Garden Grove, CA
- – Rv Trailer Rubber Roof Repair Garden Grove, CA
- – OCRV Center
Latest Posts
Laguna Hills Health Insurance Plans Individuals
Health Insurance Plans For Family Stanton
Life Insurance Family Plan Aliso Viejo
More
Latest Posts
Laguna Hills Health Insurance Plans Individuals
Health Insurance Plans For Family Stanton
Life Insurance Family Plan Aliso Viejo