All Categories
Featured
Table of Contents
- – Custom Painted Motorhomes East Irvine, CA
- – OCRV Center
- – Custom Rv Paint East Irvine, CA
- – Class A Rv Custom Paint And Repair East Irvine...
- – Paint Fiberglass Rv East Irvine, CA
- – Painting Rv Walls East Irvine, CA
- – Rv Paint East Irvine, CA
- – Custom Painted Motorhomes East Irvine, CA
- – Custom Rv Paint Jobs East Irvine, CA
- – Rv Paint Repair East Irvine, CA
- – Class A Rv Custom Paint And Repair East Irvi...
- – Painting Fiberglass Motorhome East Irvine, CA
- – Custom Motorhome Paint Jobs East Irvine, CA
- – Painting An Rv East Irvine, CA
- – Rv Paint And Body Shops Near Me East Irvine, CA
- – OCRV Center
Custom Painted Motorhomes East Irvine, CA
Guide is vital for making certain that your paint will stick and last much longer on the wall surfaces. Make sure to cover all edges and sides equally with guide and enable it to completely dry completely prior to continuing onto the next step. Utilize a great guide like Gripper or Kilz Attachment. Apply 1-2 coats of primer on all the wall surfaces that you will certainly be using shade.
Preferably, try not to overlap areas as a lot as possible; instead, utilize lengthy strokes in one instructions until you complete each wall surface area prior to moving onto one more one. You may discover it valuable to divide each wall surface into sections while repainting so that whatever looks also when done drying out in the future.
Custom Rv Paint East Irvine, CA
Again, wait 24-48 hours, and when the 2nd layer is dry, be certain to gently sand and clean down between the coats. Get top quality paint. A minimum of an eggshell or satin finish is suggested. Utilize a brush to obtain in the corners of the walls and utilize 3/8 snooze rollers to use the majority of the paint.
Thankfully, Happy Glamper Carbon monoxide is an expert in all things DIY RV restoration and has many overviews to aid with your next task. Not prepared to put the recreational vehicle valances back up? Upgrade your motor home window treatments with DIY curtains. Love the look of shiplap however not the rate tag? Try this $1 Sharpie Shiplap for a timeless appearance.
Try this DIY sharpie shiplap wall surface in the inside of your motor home to offer it design without all the extra weight. Repainting your recreational vehicle? Take a look at this detailed guide on just how to repaint motor home cupboards and transform your RV by repainting your motor home closet doors! Upgrade your motor home home windows with these very easy detailed directions on exactly how to make recreational vehicle DIY drapes that roll-up.
Class A Rv Custom Paint And Repair East Irvine, CA
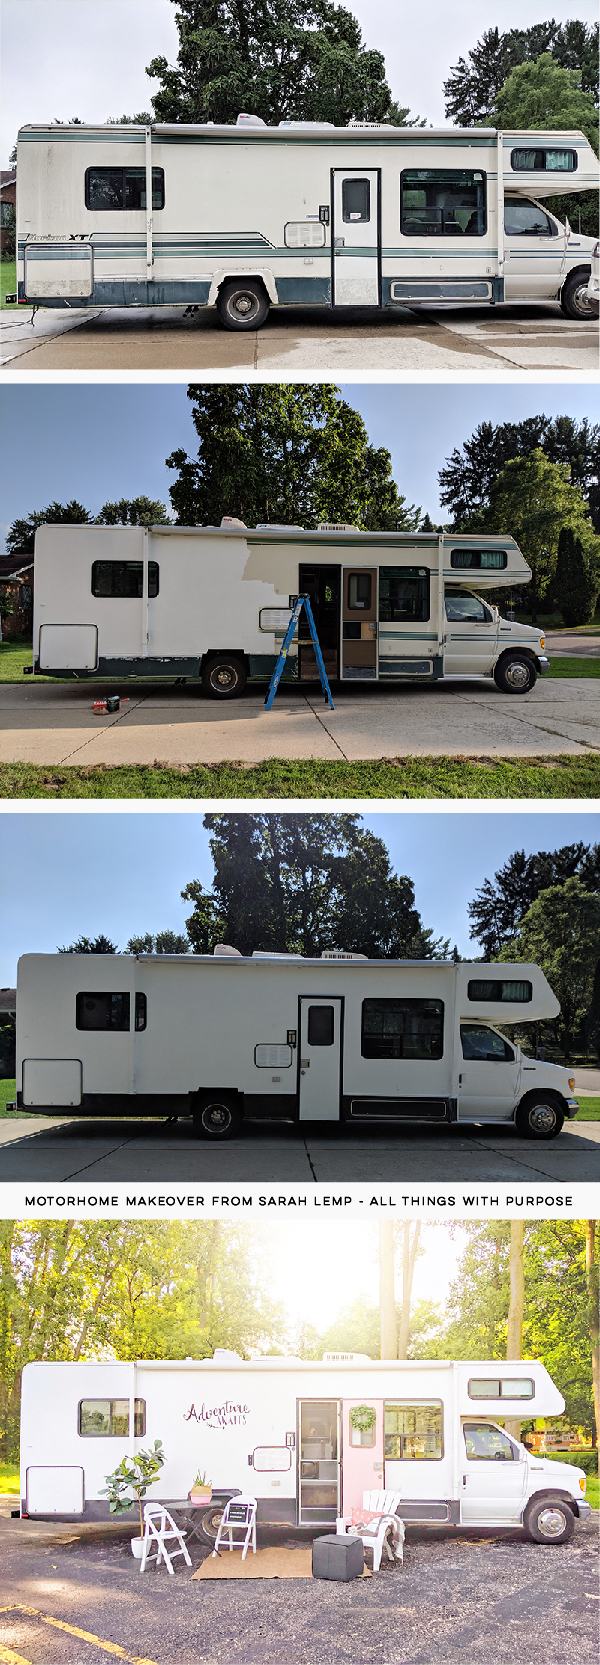
Painting your motor home can take a breath new life right into an older car and give it a fresh, updated look. Below's just how to repaint your recreational vehicle! The type of paint you select will depend on the material of your RV's exterior. For light weight aluminum or fiberglass Recreational vehicles, automotive-grade urethane or acrylic enamel paint works best because it's resilient and weather-resistant.
Start by thoroughly washing the Recreational vehicle to remove any dust, oil, or grime that can influence paint attachment. Pay extra focus to any type of areas with corrosion or existing paint chipsthese have to be fined sand down until smooth.
Paint Fiberglass Rv East Irvine, CA
Use an even layer of primer making use of a paint sprayer or roller. Operate in sections to make certain complete insurance coverage and allow the primer to dry according to the manufacturer's instructions. This may take a number of hours and even overnight, depending upon the product. Once the guide is dry, inspect it for any type of locations that require touch-ups.
With the primer completely dry and smooth, it's time to use the paint. Working in a well-ventilated location, use the paint utilizing long, even strokes with a sprayer or roller.
Use the paint in thin layers to prevent drips, and allow each coat completely dry prior to applying the following. Most Recreational vehicles will certainly need two or three layers for complete insurance coverage. Enable sufficient drying time in between coats as recommended by the paint supplier. This will assist protect against streaking and make sure a smooth, durable coating.
Painting Rv Walls East Irvine, CA
A clear layer supplies added security and a shiny coating. When the final coat of paint is completely dry, use a clear urethane topcoat to secure the paint and include a layer of security against the components. Use the same application approach similar to the paint, operating in also, overlapping strokes.
Allow the clear layer to cure totally, which may take 24-hour or more, relying on climate problems and the item you use. As soon as the clear coat is dry, eliminate all painter's tape and ground cloth very carefully. Be mindful around the sides to stay clear of peeling off paint in addition to the tape.
As soon as the paint has actually treated totally, clean the motor home gently to remove any type of remaining dust or residue from the paint process. To keep your motor home looking its best, wash it consistently with a gentle cleaner and avoid unpleasant materials that could damage the paint. Waxing the outside a few times a year can help maintain the paint's sparkle and offer additional security.
Painting your recreational vehicle can transform its look and secure it from the wear and tear of the road. With appropriate prep work and persistence, you can attain a professional-looking surface that makes your recreational vehicle appearance excellent and secures it for much more adventures to find. Whether striking the open roadway or setting up camp, a fresh coat of paint will certainly make your recreational vehicle feel like new once again.
Rv Paint East Irvine, CA
The kind of motor home outside upgrade called for will certainly rely on factors like the motor home's kind and size, the degree of any type of damage, and the problem of the stickers. Here are some crucial factors to consider to evaluate before beginning the task: Motorhome Motor homes are categorized into 3 primary classes: A, B, and C.
The area, products, and architectural information of your motor home will certainly figure out the intricacy of the job. Discolored or broken decals and graphics are clear indicators that replacements are needed. Upgrading old stickers with fresh ones can dramatically rejuvenate the look of your RV and offer it a brand-new feel.
If the paint looks faded, reveals indications of rust, or simply no longer appeals to you, think about a fresh layer of paint. A full-body repaint not only improves your motor home's visual allure however also raises its overall value. Once you recognize what your motor home requires, you have to choose whether it needs do it yourself repair job or it's something you can entrust to the pros.
Assume regarding the contentment you get looking at what you have actually achieved at the end of the day. However, these only put on specific situations. Start with a detailed cleaning to remove dust, dirt, and gunk. For the very best results, take into consideration using a power washer to ensure a deep tidy. Once the surface area is tidy and completely dry, use a high-quality wax to recover the paint's luster and secure it from the aspects. Rv Paint Shops Near Me East Irvine.
Custom Painted Motorhomes East Irvine, CA
While do it yourself can in some cases conserve money, it might not be the very best technique for intricate RV makeovers. Specialists like Leisure Coachworks have the knowledge to transform your motor home's outside with a total makeover. Selecting specialist solutions can conserve you stress and anxiety and cash in the lengthy run. Expert describing supplies your recreational vehicle with the deep cleaning it is entitled to.
Utilizing top-tier tools like sophisticated paint sprayers, our professionals accomplish a smooth, perfect outside that will stand the examination of time. When it comes to changing your Motor home stickers, you have two options: You can obtain original RV decals from suppliers that specialize in Recreational vehicle components supply.
Custom Rv Paint Jobs East Irvine, CA
This internet site uses cookies to improve your experience while you navigate through the internet site. Rv Paint Shops Near Me East Irvine. Out of these, the cookies that are classified as required are stored on your browser as they are important for the working of standard functionalities of the web site. We likewise use third-party cookies that aid us analyze and understand how you utilize this internet site
You likewise have the choice to opt-out of these cookies. Deciding out of some of these cookies may affect your surfing experience.
Do you take your Motor home to a custom paint store or go with a DO IT YOURSELF RV paint work? There's no right or incorrect solution when it comes to picking an expert RV paint task or going the Do it yourself paint course.
Rv Paint Repair East Irvine, CA
The most likely factor a person chooses to go do it yourself is due to the price factor. Relying on the dimension and design, the typical recreational vehicle paint job can range from $5,000-$15,000+. Painting a motor home by yourself, nonetheless, can be as cheap as $300 if you agree to invest the time and effort.
If you can save the joint oil, you can do the labor on your own and conserve cash at the same time. With aid from the web, you can discover to accomplish anything. There's a wealth of knowledge to lead you step-by-step through the process of painting your motor home. You can pull up a created guide on your phone (or print them out) or you can follow together with a YouTube video clip.
Class A Rv Custom Paint And Repair East Irvine, CA
While it might appear intimidating to sift through, with perseverance and determination, you can use these sources to help you transform your recreational vehicle outside. When you make a decision to repaint your motorhome on your own, you have overall control over what happens. You determine what sort of paint and materials are utilized.

Be as showy or as small as you desire. As long as you have the capacity to, you can customize your outside to your preference. There's also a feeling of accomplishment that includes taking on a huge DIY project. You can not defeat the sensation of standing back and feeling pride in the effort you've placed in.
When you go to a customized paint shop, there's an assumption in the high quality of the last item. That assumption comes from the experience and resources that a paint store has to offer.
Painting Fiberglass Motorhome East Irvine, CA
Not every person is artistically inclined. And developing layouts for a recreational vehicle may be more challenging than anticipated. If you aren't the imaginative type, a motor home paint store will have lots of well-crafted layouts and colors to select from. They'll collaborate with you to obtain the very best watch out of your recreational vehicle.
While Do it yourself is a cost-saving step, it will certainly take up a good piece of time to complete paint your Recreational vehicle. Those who work full time might discover it hard to locate the totally free time outside of the weekend break to go through painting their mobile home.
Custom Motorhome Paint Jobs East Irvine, CA
Eventually, the decision is yours on how to take care of your RV. If you determine to obtain your paint done properly and are looking for a costs, high-grade service, inspect out CDI Custom-made Paint today and get a quote.
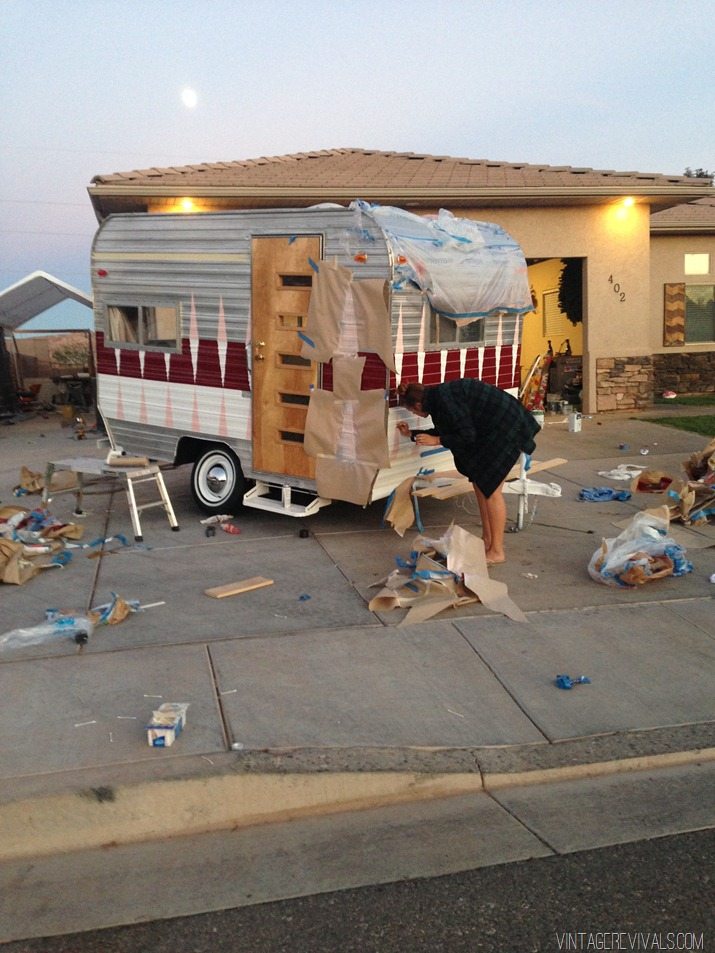
And as a result, it doesn't look that wonderful any longer. There's places where the paint is just ordinary gone. Can I simply go and get a canister of aerosol paint from an equipment shop and spray that?
And if this camper lived outside, it's obtained weather condition and sun and all kind of stuff going on. Right here is this crazy trendy thing. The insane amazing point is places that do a great deal of automobile body work, as you could imagine, are frequently attempting to match existing and older paint.
Painting An Rv East Irvine, CA
You take a portion of something. You most likely to a home facility. They placed the portion of something in a scanner, and they match that color. Currently, the distinction is when you find the best spot, you call 'em, and they put a scanner on the camper. At a car body location, they 'd be placing it on an automobile, and they do the very same point.
The method that this functioned for me was made a phone telephone call, and it was a vehicle body area that referred me to a paint shop. A solution person from the paint shop came to the camper, and they put the scanner right on the system. And I was seeking scans of the white, and afterwards there's sort of a blue and a teal, and I wanted paint so I could touch every one of those up.
We can match the blue to a 7," or whatever. So they can offer you a read in advance on just how excellent a shade suit they think they're gon na have the ability to offer you. From there, at the certain place I use, they were able to provide me with rattle cans, spray can that are in the colors I'm utilizing.
Rv Paint And Body Shops Near Me East Irvine, CA
Following thing for me, I'm gon na mask this off and this and this so we do not obtain repaint where we do not want it. And afterwards return with the white and start filling out these negative places. Shake it up, infant, currently Comply with the instructions. If it's a rattle can and it says, "Shake for a minute after the ball actions," shake for a minute after the round moves.
Obtained home windows open at that end. I have actually got a whole lot of air relocating through below.
And just prior to placing the masking tape on, cleaning whatever down with cozy soapy water is gon na obtain the deposit off of there so that the paint has every possibility to stick. Currently, as I spray, one of the things to view for is on the locations actually close to the corner, we need a fair little bit of product there to make certain we obtain this covered.
It's actually right up below that it looks the grossest. So as I function away from that edge, I'm gon na feather it a little bit by moving away from the camper and afterwards additionally perhaps not holding the switch down, however just kinda providing a ruptured of paint, a little short ruptured of paint instead of a complete.
Rv Painting East Irvine, CAPainting An Rv East Irvine, CA
Motorhome Paint Repair East Irvine, CA
Painting Rv East Irvine, CA
Rv Paint Repair East Irvine, CA
Painting An Rv East Irvine, CA
Custom Rv Paint East Irvine, CA
Painting An Rv East Irvine, CA
Class A Rv Custom Paint And Repair East Irvine, CA
Painting Rv East Irvine, CA
Motorhome Custom Paint Jobs East Irvine, CA
Painting Fiberglass Motorhome East Irvine, CA
Paint Fiberglass Rv East Irvine, CA
Rv Painting Near Me East Irvine, CA
Custom Rv Paint Jobs East Irvine, CA
Rv Exterior Paint East Irvine, CA
Motorhome Paint Shops East Irvine, CA
Rv Painter East Irvine, CA
Rv Paint East Irvine, CA
Class A Rv Custom Paint And Repair East Irvine, CA
Motorhome Custom Paint Jobs East Irvine, CA
Rv Exterior Paint East Irvine, CA
Custom Motorhome Paint Jobs East Irvine, CA
Class A Rv Custom Paint And Repair East Irvine, CA
Paint Motorhome Exterior East Irvine, CA
Rv Paint Shops Near Me East Irvine, CA
Rv Exterior Paint East Irvine, CA
Rv Paint Shops Near Me East Irvine, CA
Rv Paint East Irvine, CA
Rv Paint Shop Near Me East Irvine, CA
Rv Paint Job East Irvine, CA
Motorhome Paint Repair East Irvine, CA
Painting Rv Walls East Irvine, CA
Rv Paint Repair East Irvine, CA
Rv Paint Job East Irvine, CA
Motorhome Custom Paint Jobs East Irvine, CA
Motorhome Custom Paint East Irvine, CA
Class A Rv Custom Paint And Repair East Irvine, CA
Painting Rv Walls East Irvine, CA
Rv Painting East Irvine, CA
Class A Rv Custom Paint And Repair East Irvine, CA
Custom Painted Motorhomes East Irvine, CA
Painting Rv Exterior East Irvine, CA
Painting An Rv East Irvine, CA
Painting Rv Exterior East Irvine, CA
Rv Exterior Paint East Irvine, CA
Motorhome Painting East Irvine, CA
Painting An Rv East Irvine, CA
Rv Paint And Repair East Irvine, CA
Motorhome Custom Paint Jobs East Irvine, CA
Motorhome Paint Shops East Irvine, CA
Paint Rv East Irvine, CA
Rv Paint Shops Near Me East Irvine, CA
Rv Paint Job East Irvine, CA
Rv Painter East Irvine, CA
Paint Fiberglass Rv East Irvine, CA
Motorhome Painting Near Me East Irvine, CA
Rv Paint Shop Near Me East Irvine, CA
Custom Motorhome Paint Jobs East Irvine, CA
Custom Rv Paint East Irvine, CA
Rv Painting East Irvine, CA
Painting Fiberglass Motorhome East Irvine, CA
Rv Painting East Irvine, CA
Motorhome Painting Near Me East Irvine, CA
Motorhome Painting Near Me East Irvine, CA
Motorhome Custom Paint Jobs East Irvine, CA
Rv Exterior Paint East Irvine, CA
Paint Motorhome Exterior East Irvine, CA
Motorhome Painting East Irvine, CA
Rv Painter East Irvine, CA
Rv Paint Repair East Irvine, CA
Rv Paint Job East Irvine, CA
Rv Paint Job East Irvine, CA
Painting An Rv East Irvine, CA
Rv Paint Shops Near Me East Irvine, CA
Rv Paint Shops Near Me East Irvine, CA
Custom Painted Motorhomes East Irvine, CA
Painting Rv Exterior East Irvine, CA
Find A Good Seo Service East Irvine, CA
Companies Near Me Seo Marketing Agency East Irvine, CA
OCRV Center
Table of Contents
- – Custom Painted Motorhomes East Irvine, CA
- – OCRV Center
- – Custom Rv Paint East Irvine, CA
- – Class A Rv Custom Paint And Repair East Irvine...
- – Paint Fiberglass Rv East Irvine, CA
- – Painting Rv Walls East Irvine, CA
- – Rv Paint East Irvine, CA
- – Custom Painted Motorhomes East Irvine, CA
- – Custom Rv Paint Jobs East Irvine, CA
- – Rv Paint Repair East Irvine, CA
- – Class A Rv Custom Paint And Repair East Irvi...
- – Painting Fiberglass Motorhome East Irvine, CA
- – Custom Motorhome Paint Jobs East Irvine, CA
- – Painting An Rv East Irvine, CA
- – Rv Paint And Body Shops Near Me East Irvine, CA
- – OCRV Center
Latest Posts
Kitchen Exhaust Fan Repair Service Pacoima
Kitchen Exhaust Fan Repair Service Sunland
Hvac Servicing Studio City
More
Latest Posts
Kitchen Exhaust Fan Repair Service Pacoima
Kitchen Exhaust Fan Repair Service Sunland
Hvac Servicing Studio City