All Categories
Featured
Table of Contents
- – OCRV Center
- – Why Does Your Motorhome Need Professional Repa...
- – What Makes Custom Paint the Top Choice for Mot...
- – What Is RV Custom Paint Jobs Near Me and Why I...
- – The Professional RV Paint Process Step by Step
- – How Much Do Custom RV Paint Jobs Cost in Calif...
- – Comparing Repair Options for Motorhomes
- – Specialized RV Custom Paint Jobs Near Me Servi...
- – Real Results from Motorhome Owners
- – Common Concerns About RV Custom Paint Jobs Nea...
- – Why Choose Local RV Custom Paint Jobs Near Me ...
- – Areas We Serve Throughout Southern California
- – Frequently Asked Questions About RV Repair for...
- – We Can Help! Contact Us Today
- – OCRV Center
RV custom paint jobs near me offer motorhome owners in California a reliable way to restore faded, oxidized, or damaged exteriors that have lost their original appeal after years of UV rays and constant road use. These expert solutions use high-quality automotive coatings, state-of-the-art color-matching systems, and protective clear coats to create uniform, enduring results that resist further degradation. In areas with intense sunlight, professional repainting stops progressive damage such as gelcoat cracking or water intrusion that can lead to expensive interior or structural problems. Motorhome owners recover that brilliant, like-new appearance that boosts confidence during trips and gatherings. Professional work also increases resale potential by maintaining aesthetics and integrity over time. This method emphasizes detailed prep and superior application to secure a finish that withstands extended use with little maintenance.
Motorhomes present unique challenges due to their substantial size and composite construction, which behaves distinctly under weather exposure than standard vehicles. Fading often starts subtly with loss of gloss, developing into chalkiness and tone change that affects overall curb appeal. Custom RV painting tackles these effects via removal of prior oxidation, fixing small fractures, and utilizing layered applications with bonding primers and UV-blocking clear coats. The process focuses on consistent distribution to eliminate streaking or unevenness. Many owners learn through experience that choosing expert work removes the need for repeated fixes and achieves better endurance than quick repairs. The renewed finish looks outstanding while holding up consistently in tough settings, enhancing enjoyment on all adventures.
Why Does Your Motorhome Need Professional Repair Attention?
California's harsh UV exposure, weather shifts, and road debris accelerates outer surface wear on RVs. RV custom paint jobs near me target early indicators such as dulling paint and surface chalking that signal oxidation. Without attention, these conditions enable moisture entry, resulting in internal problems or expensive fiberglass fixes down the line. Individuals seeking where can I get my RV custom painted near me typically learn that skilled services prevent worsening and bring back brightness reliably. Skilled application of durable coatings prevents recurrence, offering peace of mind for frequent travelers.
Emotional discomfort from a worn or damaged exterior diminishes pleasure on trips and meetups. A professional restoration eliminates that worry, replacing it with excitement over a refreshed look. Financially, it sustains elevated resale potential and decreases later care costs with enhanced defense. Information from RV sector reports indicates that well-cared-for exteriors hold substantially higher worth, often by thousands of dollars compared to neglected units. This mix of emotional improvement and logical advantage positions expert service as a wise option for any owner encountering wear.
Explore RV paint shop services for expert restoration details. Learn about RV body shop capabilities that complement paint work. Discover RV fiberglass repair options for preparation needs. Contact us for a complimentary consultation to evaluate your motorhome's condition and discuss effective solutions.
What Makes Custom Paint the Top Choice for Motorhome Restoration?
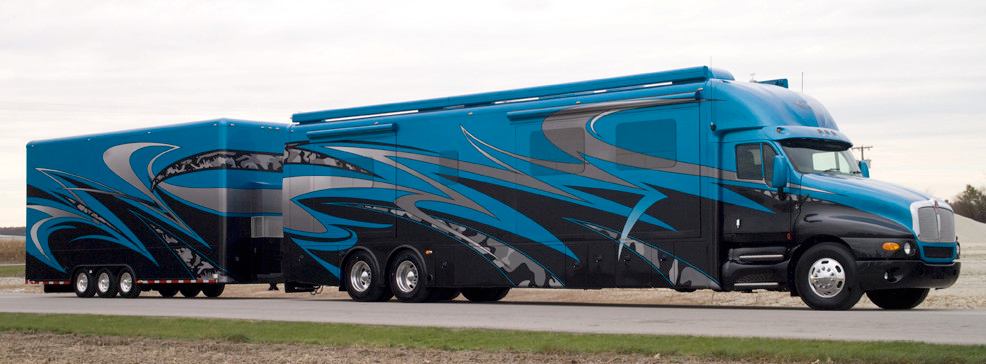
Custom RV paint jobs excel beyond vinyl applications and ordinary repaints because they create permanent, seamless bonds that prevent peeling, fracturing, or detachment under sun, wind, and regular washing. Custom paint for RVs adheres directly to the surface, providing uniform coverage without visible seams or edges that may deteriorate eventually. In high-UV regions, UV protection for RV paint becomes a key advantage, with multi-layer clear coats blocking damaging rays, keeping color depth much longer than typical finishes. Owners often ask is custom paint better than decals for RVs and find that painted finishes deliver superior longevity and a true factory appearance that holds up through seasons of use.
Customization emerges as a significant advantage. RV color matching technology allows exact replication of original shades or development of completely fresh designs featuring metallic, pearlescent, or bespoke graphic elements. These options reflect personal style while adding functional protection against weathering. The finish withstands regular washing and exposure without degrading, simplifying maintenance while improving effectiveness. This level of detail ensures the motorhome not only looks impressive but also maintains its condition longer, supporting both aesthetic and practical needs.
The customized result restores that showroom freshness and dispels continual anxiety over visual condition. Reach out to explore design possibilities tailored to your motorhome. Discover RV remodel options that pair well with paint upgrades. See RV fiberglass repair services for preparation support. Explore RV roof repair solutions for complete exterior care.
What Is RV Custom Paint Jobs Near Me and Why It's Important
RV custom paint jobs near me include expert repainting that refreshes and safeguards RV surfaces using high-quality coatings, careful surface readiness, and modern protective topcoats. These jobs resolve frequent concerns including sunlight fading, oxidation layers, and light damage from travel. In locations experiencing intense UV, the work proves essential to stop advancing breakdown and avert significant follow-on issues including water penetration or structural damage.
The advantage stems from preserving value while increasing daily satisfaction. Ignored finishes degrade gloss and durability fast, decreasing market value and elevating maintenance demands. Skilled approaches ensure solid adhesion, steady color, and strong weather protection. RV owners receive a unit that appears outstanding and performs dependably in actual conditions. Industry material studies show UV-protective coatings greatly prolong surface life versus untreated ones.
Explore RV maintenance services to support long-term care. View comprehensive RV service offerings. Contact us to see how this service fits your restoration objectives.
The Professional RV Paint Process Step by Step
The RV paint process step by step establishes the basis for outstanding RV custom paint jobs near me by prioritizing adhesion, uniform application, and lasting durability. It begins with thorough consultation to align on objectives, evaluate state, and outline scope. Technicians perform comprehensive inspections to detect all visible and hidden issues, making certain all concerns are addressed. This preliminary stage creates achievable goals and eliminates unforeseen issues later.
Prep work dominates the sequence, starting with thorough cleaning to remove contaminants, including oxidation removal, gelcoat or fiberglass correction, and primer application for perfect bonding. Paint application advances with base coats for exact color delivery, optional special effects like metallics or candies, plus several protective clear layers for superior shielding. Concluding polishing and thorough inspection confirm perfect coverage and excellence. This detailed sequence far exceeds quick jobs by emphasizing longevity and resistance to environmental stress.
Uniform care throughout yields trustworthy, top-tier results. Contact us to understand how this framework applies to your motorhome. Check RV collision repair integration for combined services. Review RV fiberglass repair details as part of prep. See RV roof repair support for complete protection.
How Much Do Custom RV Paint Jobs Cost in California?
How much does a custom RV paint job cost fluctuates according to motorhome length, present condition, and desired extent, generally ranging from $8,000 to $25,000+ for comprehensive full-body work. Smaller trailers or partial repaints begin around $5,000–$12,000, whereas bigger Class A or Super C models with intricate patterns or major preparation hit upper levels. Prep needs like intensive oxidation elimination or fiberglass correction significantly impact the total.
Transparent breakdowns enable confident planning without surprise costs - Diamond Bar Custom Painted Motorhomes. Elements such as custom graphics or metallic finishes add to the investment but deliver enhanced uniqueness and durability. Honest discussions detail every part, ensuring the cost aligns with particular needs and budget parameters. This clarity helps owners see the value in quality over short-term savings
View RV service pricing insights. Request quote consultation. Request a detailed quote tailored to your specific motorhome for precise planning.
Comparing Repair Options for Motorhomes
Reviewing options obviously reveals why professional RV custom paint jobs near me provide better outcomes compared to DIY efforts or average shops. Home methods cut early spending but commonly cause insufficient preparation, uneven application, and early failure that requires additional work. Standard shops may provide lower rates but often lack advanced equipment or robust warranties, resulting in variable quality and reduced durability.
Elite services employ large downdraft facilities, cutting-edge matching equipment, and multi-year guarantees for superior outcomes. Efficiency remains high while focusing on completeness and precision. Contrasts show in longevity, appearance uniformity, and long-term value.
See RV body shop advantages. Explore collision integration benefits - Diamond Bar Custom Painted Motorhomes. Evidence consistently favors expert execution for maximum long-term benefits. Explore how premium quality benefits your project
| Feature | DIY | Average Shop | Premium Service |
|---|---|---|---|
| Durability | short-term 2-5 years | 7–10 years | 12 years and beyond |
| Cost Range | budget $2,000-$6,000 | mid-range $6,000-$12,000 | $8,000–$25,000+ |
| Warranty | No coverage | Limited 1 year | Multi-year |
| Equipment | Standard home tools | Basic professional tools | State-of-the-art booths and color tech |
| Turnaround | Extended and unpredictable | 6 to 12 weeks | Efficient 4-8 weeks |
Specialized RV Custom Paint Jobs Near Me Services for Unique Conditions
Motorhomes face diverse challenges that call for customized RV custom paint jobs near me. Regions with strong sunlight demand enhanced UV protection to minimize fading while keeping color intensity. Vehicles with prior impact damage require combined body repair before coating to ensure even, consistent surfaces throughout.
High-mileage or off-road RVs gain from impact-resistant coatings and strengthened topcoats that withstand strikes and wear more effectively. These customized offerings pick suitable products and approaches for particular demands, guaranteeing reliable performance under unique stresses without premature deterioration.
Adapting to unique requirements maximizes both protection and owner satisfaction. Discuss your motorhome's specific history for recommendations tailored to your needs. Check RV roof repair services for related protection. Explore RV slide out repair for complementary work. See fiberglass repair details for specialized prep.
Real Results from Motorhome Owners
RV owners completing skilled repainting notice clear upgrades in both appearance and confidence on the road. One owner from Anaheim reported: "The repaint transformed our Class A—color is perfect and it has held up beautifully through summer heat." Sarah from Irvine noted: "The insurance handling was seamless and the final finish appears brand-new." A Yorba Linda owner explained: "No more worrying about fading; the durability is impressive and resale value increased significantly."
Such stories emphasize renewed pride and functional benefits including simpler maintenance and increased market value. UV-resistant finishes combined with straightforward care routines extend vibrancy and minimize future costs. Consistent results across different motorhome classes demonstrate dependable expertise and repeatable quality.
Reliable execution produces lasting success. Discover what similar outcomes could do for your RV. Read more customer testimonials for real experiences. View before-and-after photos of completed projects.
Common Concerns About RV Custom Paint Jobs Near Me and How We Solve Them
Numerous RV owners voice questions about project duration, color accuracy, or finish longevity when considering RV custom paint jobs near me. Well-planned scheduling and open dialogue ensure realistic timelines without sacrificing quality. Cutting-edge color-matching technology ensures exact RV color reproduction matching current or preferred tones.
Long-term warranties and ongoing assistance resolve longevity concerns. Transparent processes eliminate uncertainty by explaining each stage and expected outcomes. These measures create trust and alleviate stress across the whole process.
Contact us to address your specific concerns and move forward with confidence. Schedule your consultation. See RV collision repair support for related services. Explore full service options.
Why Choose Local RV Custom Paint Jobs Near Me Experts
Opting for nearby RV custom paint jobs near me builds pride in a bold, eye-catching exterior, anticipation for coming trips, and confidence in long-lasting performance. It erases self-consciousness about faded or damaged finishes and provides security through robust defense from sunlight, road debris, and weather. Financially, it elevates resale potential, lowers repair needs, and delivers solid returns through lasting durability and decreased upkeep costs.
Regional professionals blend easy access with extensive knowledge of local conditions including high UV and road debris. Guarantees of satisfaction and committed assistance provide dependability throughout the project. This combination of emotional gains and logical advantages renders the choice beneficial in all aspects.
Reach out for a complimentary consultation to experience these advantages firsthand. View RV service details. Explore RV maintenance plans. Contact us today.
Areas We Serve Throughout Southern California
Coverage extends throughout wide regions of Southern California, encompassing Orange County cities such as Anaheim, Santa Ana, Irvine, Huntington Beach, Garden Grove, Fullerton, Orange, Costa Mesa, Mission Viejo, Westminster, Newport Beach, Buena Park, Lake Forest, Tustin, Yorba Linda, Fountain Valley, Laguna Niguel, San Clemente, La Habra, Cypress, Rancho Santa Margarita, Seal Beach, Placentia, Brea, Stanton, San Juan Capistrano, Laguna Hills, Laguna Beach, Aliso Viejo, Villa Park, Laguna Woods, Dana Point, Los Alamitos, La Palma; as well as Los Angeles County, Inland Empire regions, Riverside County, San Bernardino County, Ventura County, San Diego County, and nearby communities accessible via key freeways such as the 5 and 91.
This broad service area delivers consistent quality to different motorhome owners, tailoring to area-specific needs while preserving high standards. Proximate locations facilitate fast scheduling and effective work completion.
OCRV Center, 23281 La Palma Ave. Yorba Linda CA 92887, (714) 909-1444, provides expert RV custom paint jobs near me with certified technicians, proven methods, and a satisfaction guarantee. If you are looking for professional RV custom paint jobs near me in California, OCRV Center stands as a trusted partner. Certified experts specialize in RV custom paint jobs near me and related services, delivering efficient and reliable outcomes. Whether you own an RV, manage a fleet, or operate commercial vehicles, diverse projects receive precise attention and care. Conveniently located near major freeways in Southern California, nearby cities benefit from prompt service. Complimentary consultations provide clear estimates. Extensive experience and a satisfaction guarantee ensure optimal vehicle performance. OCRV Center enhances your RV with confidence—reach out today to start the process.
Frequently Asked Questions About RV Repair for Motorhomes
What is the average cost for RV custom paint jobs near me?
Typical costs range from $8,000 to $25,000+ for full-body motorhome repaints, depending on length, preparation needs such as oxidation removal or fiberglass repair, and design complexity. Smaller or partial jobs start around $5,000–$12,000. Custom graphics or metallic finishes add value but increase totals. Professional work provides better long-term savings than repeated minor fixes. See RV paint shop details. (110 words)
How long does the custom paint process take?
Projects generally finish in 4–8 weeks, influenced by scope, scheduling, and required repairs. Preparation and drying between layers take the most time. Clear communication keeps timelines realistic and minimizes disruption. Efficient handling maintains quality throughout. Explore RV service timelines. (85 words)
Does insurance cover motorhome paint repairs?
Coverage often applies to collision or damage-related claims based on policy terms. Assistance with paperwork and direct insurer coordination simplifies the process. Cosmetic fading usually counts as maintenance, but accident-related repaints frequently qualify. Reviewing your policy clarifies eligibility. Learn about RV collision repair insurance. (90 words)
What makes a good RV repair shop in California?
Key traits include certified technicians, downdraft booths for clean application, precise matching equipment, and multi-year warranties. Strong reviews, insurance handling experience, and transparent pricing indicate reliability. Knowledge of local climate conditions adds significant value. Read about our expertise. (85 words)
How to maintain a fresh custom paint finish?
Use gentle, RV-safe washing products to avoid residue. Apply wax or sealants seasonally for added UV protection. Park in shade when possible and avoid abrasive cleaners. Regular care extends vibrancy and reduces oxidation risk. See RV maintenance tips. (80 words)

Are custom graphics included in standard packages?
Basic striping and simple designs frequently appear in standard packages, while complex airbrush or multi-color patterns come as optional upgrades. Consultations clarify what fits each project. Personalized graphics add uniqueness while preserving durability. Explore RV remodel options. (85 words)
What improvements can you expect from professional RV custom paint jobs near me?
Anticipate revived gloss, consistent color, and strong resistance to fading or cracking. Resale value often increases 10–20%, cleaning becomes easier, and future repairs decrease. The finish achieves factory-quality appearance and withstands harsh conditions effectively. View customer results. (85 words)
How does UV damage affect RV exteriors in California?
Intense rays degrade pigments and clear coats, causing chalkiness, fading, and surface weakness. Untreated exteriors degrade quickly, leading to cracking or water intrusion. Professional repaints with UV-resistant layers reverse and prevent this damage reliably. Check fiberglass repair support. (80 words)

Can custom paint protect against road debris?
Reinforced clear coats and proper application increase resistance to chips and scratches. Strong preparation ensures excellent bonding that holds up under impact. This reduces visible damage from travel and preserves appearance longer. See body shop protection details. (75 words)
Why is prep work critical in RV painting?
Preparation removes oxidation, repairs cracks, and creates a solid adhesion base. Skipping it leads to peeling, bubbling, or early failure. Thorough prep guarantees extended performance and flawless final results. Learn more about paint preparation. (75 words)
We Can Help! Contact Us Today
If you’re seeking professional RV custom paint jobs near me in California, OCRV Center is your trusted partner. Our certified experts specialize in RV custom paint jobs near me and more, delivering fast, reliable results. Whether you’re an RV owner, fleet manager, or commercial operator, we’ve served every type of vehicle with precision and care. Conveniently located near major freeways in Southern California, we serve nearby cities efficiently. Complimentary consultations offer clear estimates. With extensive experience and a satisfaction guarantee, we ensure your vehicle thrives. Let OCRV Center boost your RV with confidence—contact us today to get started!
Get Your Custom Paint Quote Today
OCRV Center
Address: 23281 La Palma Ave Yorba Linda, CA 92887Phone: (714) 909-1444
Email: [email protected]
OCRV Center
Paint Rv Diamond Bar, CA
Rv Paint And Repair Diamond Bar, CA
Paint Fiberglass Rv Diamond Bar, CA
Painting Rv Walls Diamond Bar, CA
Paint Fiberglass Rv Diamond Bar, CA
Painting Rv Exterior Diamond Bar, CA
Rv Paint Job Diamond Bar, CA
Painting Rv Exterior Diamond Bar, CA
Painting Rv Diamond Bar, CA
Motorhome Painting Near Me Diamond Bar, CA
Painting An Rv Diamond Bar, CA
Rv Paint And Repair Diamond Bar, CA
Motorhome Custom Paint Diamond Bar, CA
Rv Paint And Repair Diamond Bar, CA
Rv Paint Diamond Bar, CA
Rv Paint And Body Shops Near Me Diamond Bar, CA
Custom Rv Paint Jobs Diamond Bar, CA
Motorhome Custom Paint Jobs Diamond Bar, CA
Motorhome Custom Paint Jobs Diamond Bar, CA
Custom Rv Paint Diamond Bar, CA
Paint Motorhome Exterior Diamond Bar, CA
Custom Motorhome Paint Jobs Diamond Bar, CA
Rv Paint Repair Diamond Bar, CA
Rv Paint And Repair Diamond Bar, CA
Motorhome Custom Paint Jobs Diamond Bar, CA
Custom Rv Paint Diamond Bar, CA
Rv Exterior Paint Diamond Bar, CA
Custom Motorhome Paint Jobs Diamond Bar, CA
Paint Motorhome Exterior Diamond Bar, CA
Class A Rv Custom Paint And Repair Diamond Bar, CA
Rv Paint Repair Diamond Bar, CA
Motorhome Custom Paint Jobs Diamond Bar, CA
Rv Paint Repair Diamond Bar, CA
Painting Rv Walls Diamond Bar, CA
Motorhome Paint Repair Diamond Bar, CA
Class A Rv Custom Paint And Repair Diamond Bar, CA
Paint Motorhome Exterior Diamond Bar, CA
Class A Rv Custom Paint And Repair Diamond Bar, CA
Custom Motorhome Paint Jobs Diamond Bar, CA
Paint Motorhome Exterior Diamond Bar, CA
Painting Rv Diamond Bar, CA
Class A Rv Custom Paint And Repair Diamond Bar, CA
Class A Rv Custom Paint And Repair Diamond Bar, CA
Class A Rv Custom Paint And Repair Diamond Bar, CA
Rv Paint Shops Near Me Diamond Bar, CA
Paint Fiberglass Rv Diamond Bar, CA
Motorhome Painting Diamond Bar, CA
Custom Rv Paint Diamond Bar, CA
Custom Rv Paint Diamond Bar, CA
Painting Rv Walls Diamond Bar, CA
Painting Rv Walls Diamond Bar, CA
Custom Rv Paint Diamond Bar, CA
Painting An Rv Diamond Bar, CA
Painting Rv Diamond Bar, CA
Rv Painter Diamond Bar, CA
Motorhome Painting Diamond Bar, CA
Rv Painter Diamond Bar, CA
Custom Painted Motorhomes Diamond Bar, CA
Painting Rv Walls Diamond Bar, CA
Rv Exterior Paint Diamond Bar, CA
Custom Rv Paint Diamond Bar, CA
Rv Paint Diamond Bar, CA
Rv Paint Repair Diamond Bar, CA
Motorhome Paint Shops Diamond Bar, CA
Rv Paint Repair Diamond Bar, CA
Paint Fiberglass Rv Diamond Bar, CA
Rv Paint And Body Shops Near Me Diamond Bar, CA
Class A Rv Custom Paint And Repair Diamond Bar, CA
Paint Rv Diamond Bar, CA
Custom Rv Paint Diamond Bar, CA
Motorhome Painting Near Me Diamond Bar, CA
Rv Paint Job Diamond Bar, CA
Paint Fiberglass Rv Diamond Bar, CA
Custom Painted Motorhomes Diamond Bar, CA
Painting Rv Walls Diamond Bar, CA
Rv Painter Diamond Bar, CA
Rv Paint And Repair Diamond Bar, CA
Rv Paint Shop Near Me Diamond Bar, CA
Find A Seo Expert Diamond Bar, CA
Around Me Seo Consultant Diamond Bar, CA
OCRV Center
Rv Painter Diamond Bar, CA
Custom Painted Motorhomes Diamond Bar, CA
Table of Contents
- – OCRV Center
- – Why Does Your Motorhome Need Professional Repa...
- – What Makes Custom Paint the Top Choice for Mot...
- – What Is RV Custom Paint Jobs Near Me and Why I...
- – The Professional RV Paint Process Step by Step
- – How Much Do Custom RV Paint Jobs Cost in Calif...
- – Comparing Repair Options for Motorhomes
- – Specialized RV Custom Paint Jobs Near Me Servi...
- – Real Results from Motorhome Owners
- – Common Concerns About RV Custom Paint Jobs Nea...
- – Why Choose Local RV Custom Paint Jobs Near Me ...
- – Areas We Serve Throughout Southern California
- – Frequently Asked Questions About RV Repair for...
- – We Can Help! Contact Us Today
- – OCRV Center
Latest Posts
Eye Insurance For Seniors Irvine
Westminster Medicare Dental Insurance For Seniors
Key Man Disability Insurance Garden Grove
More
Latest Posts
Eye Insurance For Seniors Irvine
Westminster Medicare Dental Insurance For Seniors
Key Man Disability Insurance Garden Grove